AERMACCHI HD 350 CAFE RACER
Part 1
For some years I've been toying with the idea of buying an Aermacchi road bike. This is the marque whose race bikes my father Syd used to import and prepare with a great deal of success: British championships in the '60s; a second place in the '70 Junior TT behind Agostini's all-conquering MV, with Alan Barnett lapping at 99.99 mph; various Manx GP wins in the '70s; capped off by Richard Swallow winning the Junior Classic Manx GP five years running from '87-91. These were also the bikes on which I cut my own teeth in racing in the 1980s and had quite a bit of success. So, although hardly in the mood to be breaking bones on the track again, for some time I've wanted to reacquaint myself with a bike for which I have huge fondness - and as something of a tribute to my late father too.
Having said that I've never been crazy about the road frames produced by Aermacchi during the '60s. They had their fair share of pressed steel, while the rear subframes retained a somewhat agricultural look for at least a decade. But even replica race frames are expensive, plus I wanted to create a practical road bike, with lights and so on. So what to do?
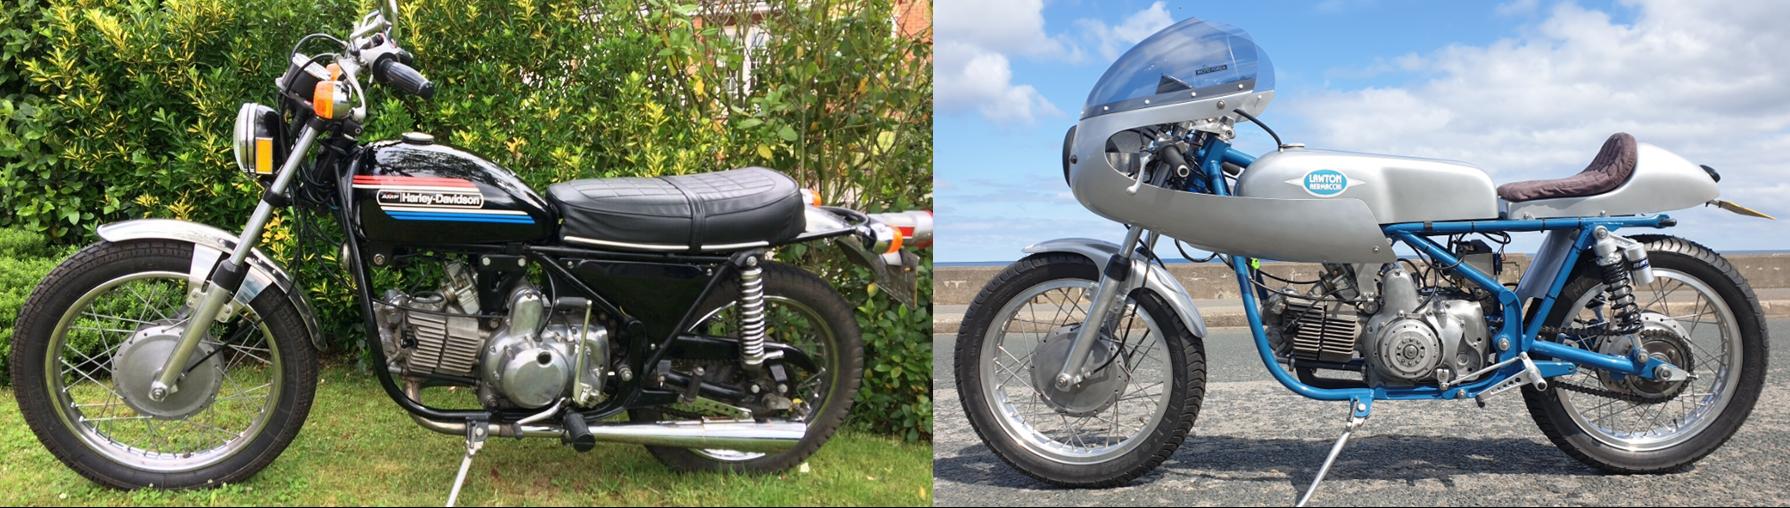
The breakthrough came several months ago when I discovered that in '73-4 Harley Davidson - who had acquired a 50% stake in Aermacchi some years before - switched to a very different twin-loop frame with a redesigned rear end. Not only that but these bikes had an electric start. Bonus! I still don't find the SS350 'Sprint' of that era a particularly attractive bike, but I did think it could form the basis for a wonderful cafe racer.
This view was reinforced when I discovered this picture of just such a bike, created by Scott Brown in the US. While I don't much care for all the chrome and the 'Rickman-style' bodywork, it fired my imagination and the hunt for a donor bike was on...
Part 2
My search was initially frustrating. I could only find one bike on the net, in Spain - and the owner wasn't responding to emails anyway. Several months went by and then, eureka! an eBay alert informed me that a black, 4200-mile bike had come onto the market in the east of England. From the pictures it looked to be in exceptional condition, and the owner Simon was asking £4000. Actually this was probably a very reasonable price but, when I contacted him and explained my history with the bikes - and that it would be coming over to the Isle of Man, which he had enjoyed visiting a number of times - he generously accepted my initial offer of £3400. Result!
I spoke to old family friend and ex-GP winner Chas Mortimer, who set up the leading European motorcycle delivery business many years ago, and he agreed to charge a very reasonable fee to deliver it to the Island Express warehouse near Liverpool, while they in turn quoted a very reasonable price to ship it over on the ferry. To cap it off my great friend and ex-racing rival Chris McGahan kindly agreed to pick it up in his van, which as an ex-Ambulance is equipped with a ramp, and even to give me the use of a hydraulic bench in his Peel workshop - all for the price of the odd pint or breakfast! Having prepped several Honda cafe racers in less helpful surroundings e.g. on the pavement outside my old flat, this was luxury indeed.
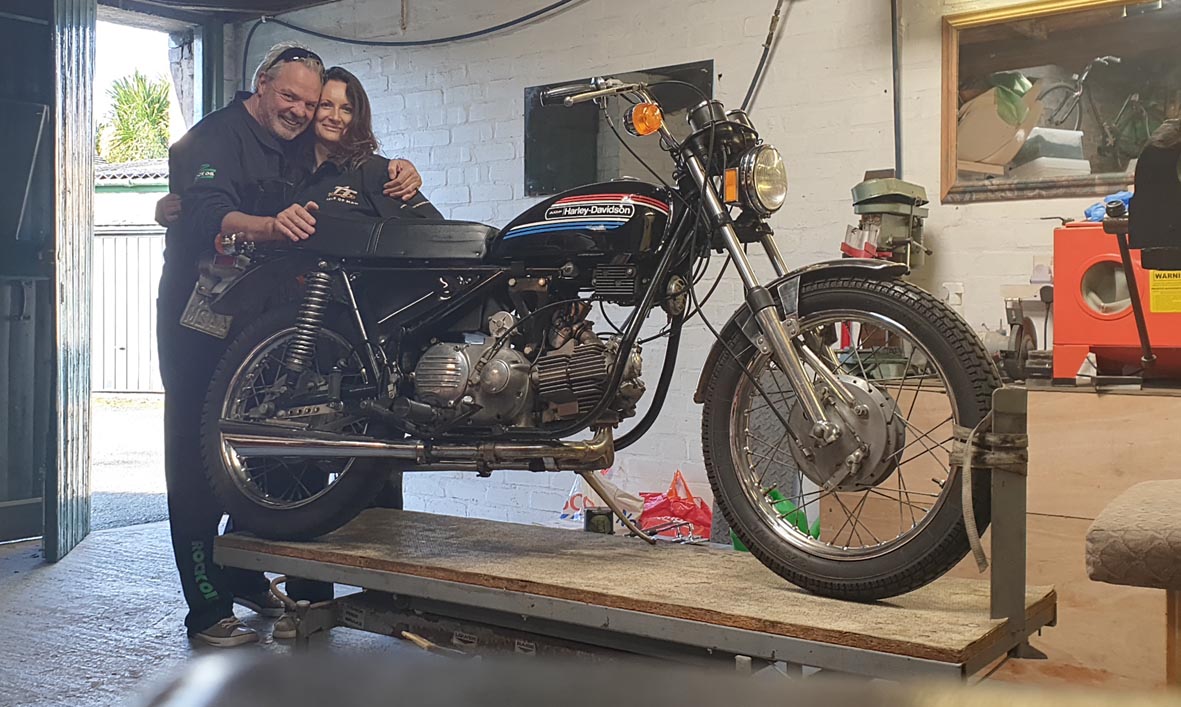
Here I am with the bike just before the stripdown commenced... along with my wonderful partner Mirka who, thank the gods, is entirely supportive and keen to get involved.
Part 3
The strip-down progressed without much incident. The various parts being removed and sold were cleaned up, photographed and advertised on eBay and various specialist Facebook groups - and several generous offers for various parts were quickly received and accepted.
Mind you, Chris had mentioned that the bike was very heavy for its size especially at the rear, and he wasn't wrong! For example the rear brake lever is a heavy, industrial-sized piece that probably came from a much bigger Harley, and their influence on the cycle parts is pretty obvious. But almost all of this heavy-duty stuff will be replaced with lightweight components, so the end result should be quite different.
Generally speaking though the bike is a pleasure to work on, nice and simple compared to modern or multi-cylinder machines, with only a few of those annoying design features that leave you asking "why, why, why?" It also became clear just what lovely, unspoilt condition it's in. No rust anywhere - it was only imported from the US in 2013 - and all the electrics are original and good, with the useful addition of a more-reliable, low-maintenance, electronic-ignition system to replace the mechanical points.
The main cycle parts, electrical components, wiring loom and engine were soon removed - the latter more easily from the right-hand side for anyone doing the same. And here here I am making it even lighter with an angle grinder, getting rid of redundant brackets etc...

Part 4
The strip-down was completed by removing both wheels and the front forks, rear shocks and swinging arm. This was all uneventful apart from the steering column, which needed serious hammering from above to force it down through its two bearings - not something the manual warns about.
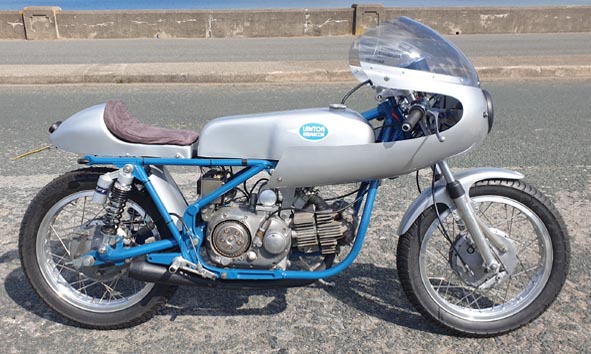
A separate development was to choose a colour scheme. A picture of another Aermacchi cafe racer with a race frame, brakes and so on proved so popular when I showed it around that I felt I just had to go the same way - although a metallic, bluey-turquoise frame matched with graphite grey bodywork would be a considerable departure from the stock, bright-red Aermacchi colours our race bikes always sported. It was later pointed out to me that this was, of course, a reprise of the infamous, Paul Smart, Imola-winning, 750SS Ducati from the early-70s. In keeping with this the aforementioned bike sported a half fairing, something I've never been keen on for my previous cafe racers, but it just looked superb on the 'Macchi. So this was ordered along with race-style, fibreglass, front and rear mudguards from Motoforza in Czechoslovakia, while a separate order was put in to B&B Meccanica in Italy for a similar petrol tank and seat, and a race exhaust. Meanwhile alloy footrests and pedals that would be mounted on the original passenger brackets, and similar clipons for the 30mm forks, were inexpensively sourced on eBay.
Jumping the gun slightly, I had always wanted to add the finishing touch of 'Lawton Aermacchi' decals on the fuel tank of any such creation. I only found out later that my brother Barry still had a stock of the originals we had made up more than 30 years ago, but in any case these were in red and I wanted to match the new frame colour. I couldn't even remember who made these up and, although I found a picture of one on a bike on the internet, I had no idea of the identity of the distinctive font. Brainwave! I joined a specialist Facebook group who kindly informed me what it was, I got cracking with Powerpoint, and here is the result...

Part 5
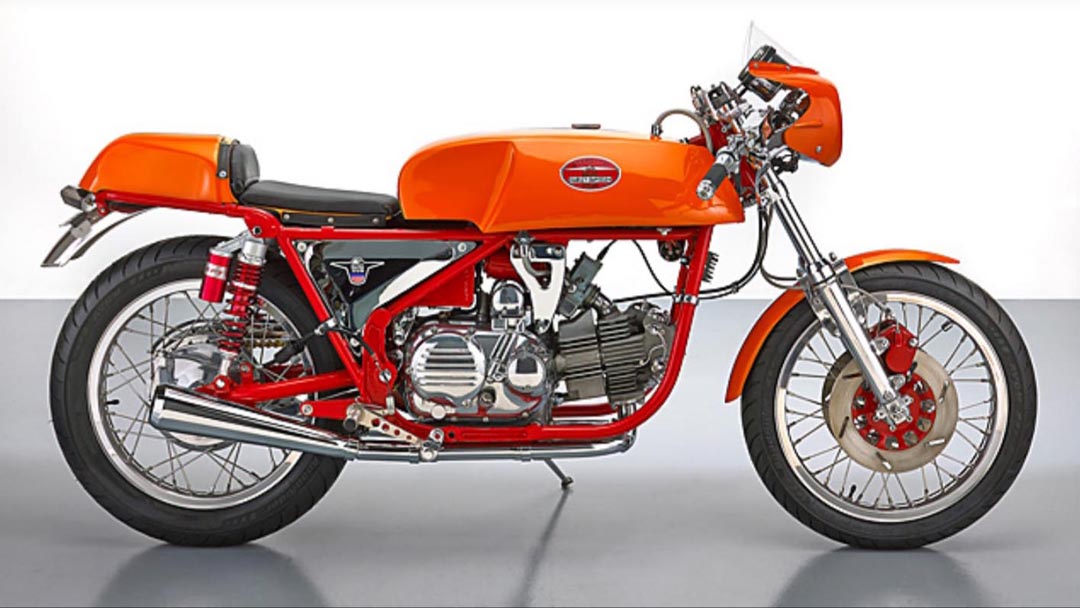
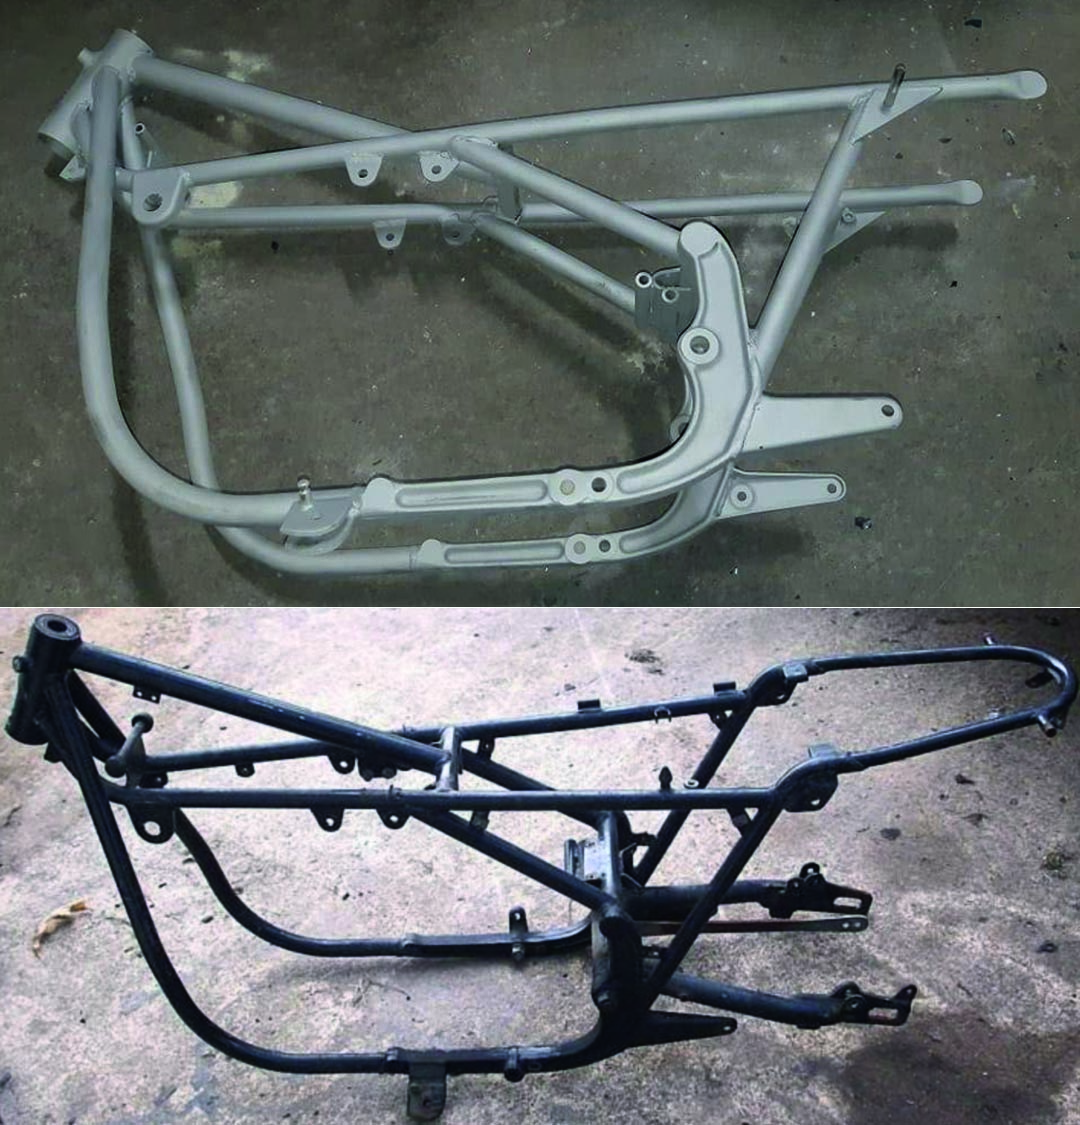
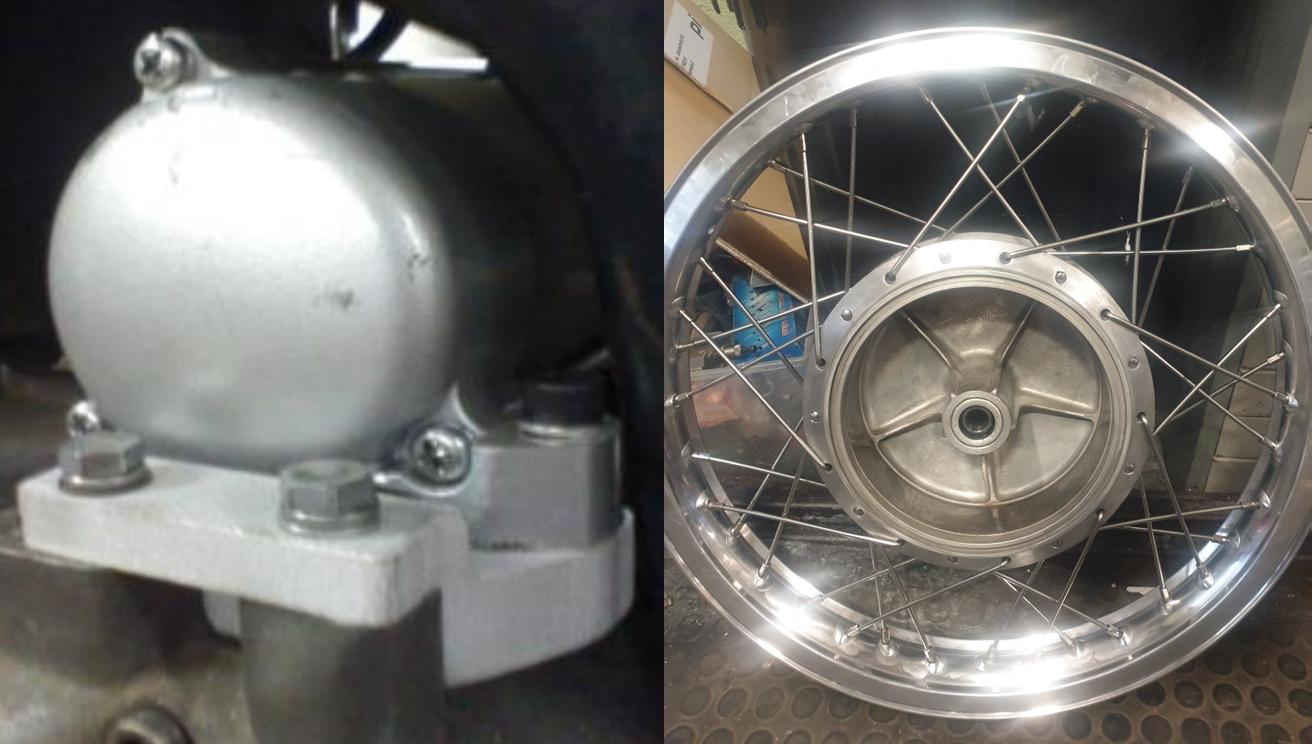
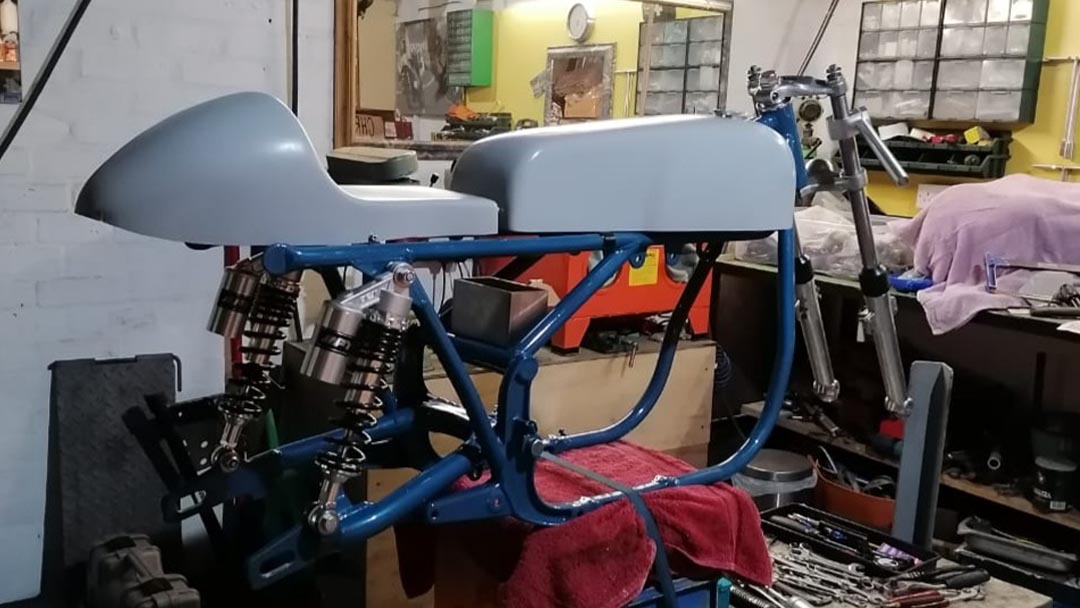
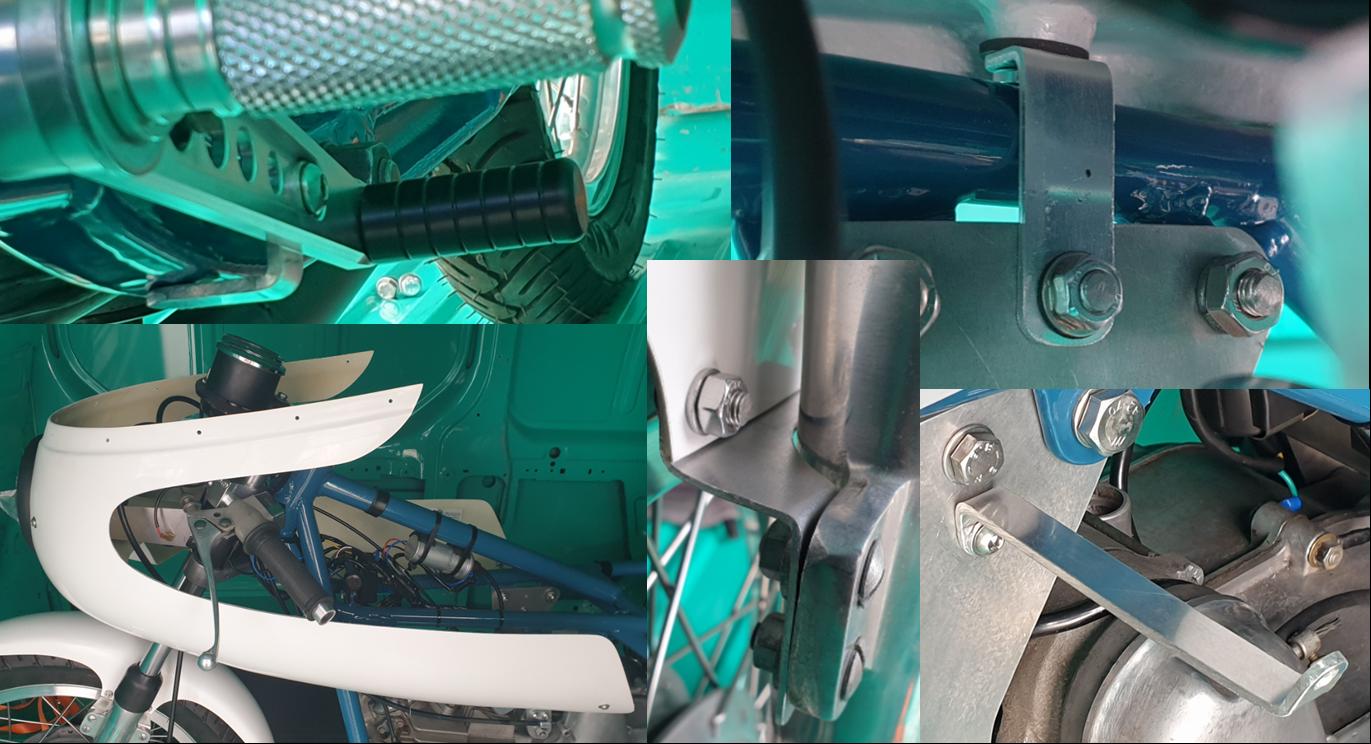
Back to the frame, which needed to go to Ian Tunney at Manx Powder Coating in Union Mills for welding and painting. Although the rear subframe was better than the older bikes, it was still somewhat large and ungainly, especially in the way it rose several inches in the vicinity of the rear shock mounts. In any case I wanted to fit a race-style seat, which was narrower and would normally sit on horizontal rails. The importance of making a change was reinforced by the one element of Scott Brown's bike that I really didn't like - the way the seat was mounted on the original, wide, two-level, rear subframe (see first picture).
My solution was to cut the frame on each side to remove the old shock mounts, then take the frame to Ian who bent the two main rails and the rear diagonals in to reduce the distance between them from 230mm to 190mm, then welded a 200mm-long, 25mm-diameter steel tube onto each side to form a simplified rear subframe - and most important these were neatly flattened at the end just like the race frames. A new gusset was then welded at the rear of each joint with a high-tensile shock mounting bolt, and these new mounts were fitted flush with the outside of the frame tubes. This meant that, with the top of the shocks also mounted on the outside of these with 10mm spacers on each side, the width between them approximated to the 260mm at the bottom on the swinging arm. The alternative would have been to significantly reduce the width of the latter, and of the rear wheel and brake, but that would have been a much more complex modification.
Before I removed the swinging arm I also measured the vertical height from the bottom shock mounts to the bottom of what would be the horizontally continued frame rails as 310mm, with the original 330mm-long shocks. Once the new rear subframe was in place I measured again and found that the original geometry would be more or less retained if I replaced them with slightly shorter, 320mm, remote-reservoir units from RFY, which were reported as excellent value.
This picture shows the revised frame after blasting but before painting, comparing it to an original version...
Part 6
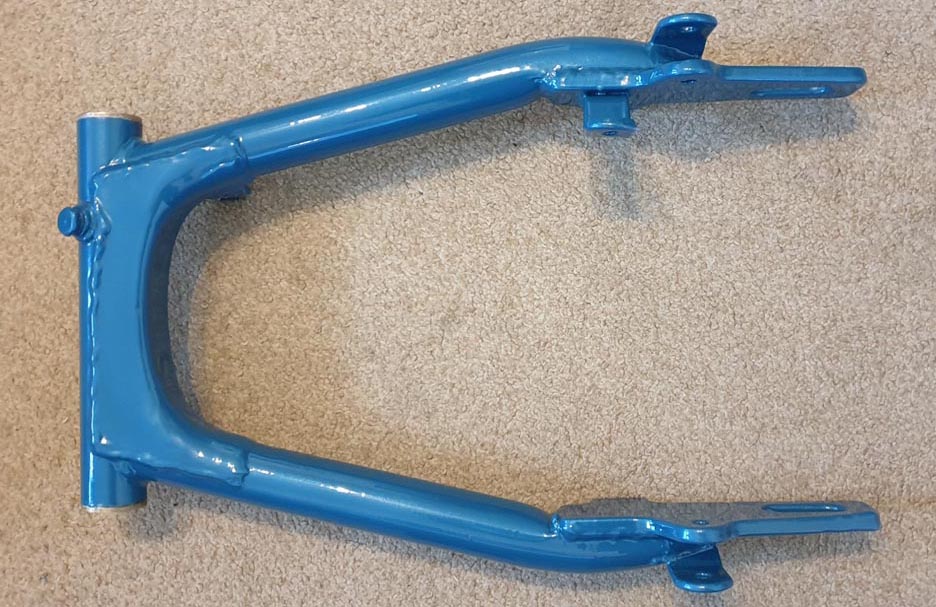
When I collected the painted frame, what a fabulous job Ian had made of it. The powder coating gives a really thick, lustrous finish, and he told me our choice of metallic paint has a beautiful sparkle in the sunlight. The only problem was that I didn't think to ask him to mask off the swinging arm bushes, headstock bearing recesses and various other threads, holes, inner surfaces and so on, meaning I was continually faced with spending significant time with a combination of Nitromors, an engineer's scraper, a drill and/or a Dremel carefully removing the thick coating. The same was true of the tiny grease nipple that originally existed under the paint on the grease bolt, but I obtained a standard M10 item that allowed me to grease it. Here is the swinging arm, showing off the bushes, bolt and lovely paint...
Part 7
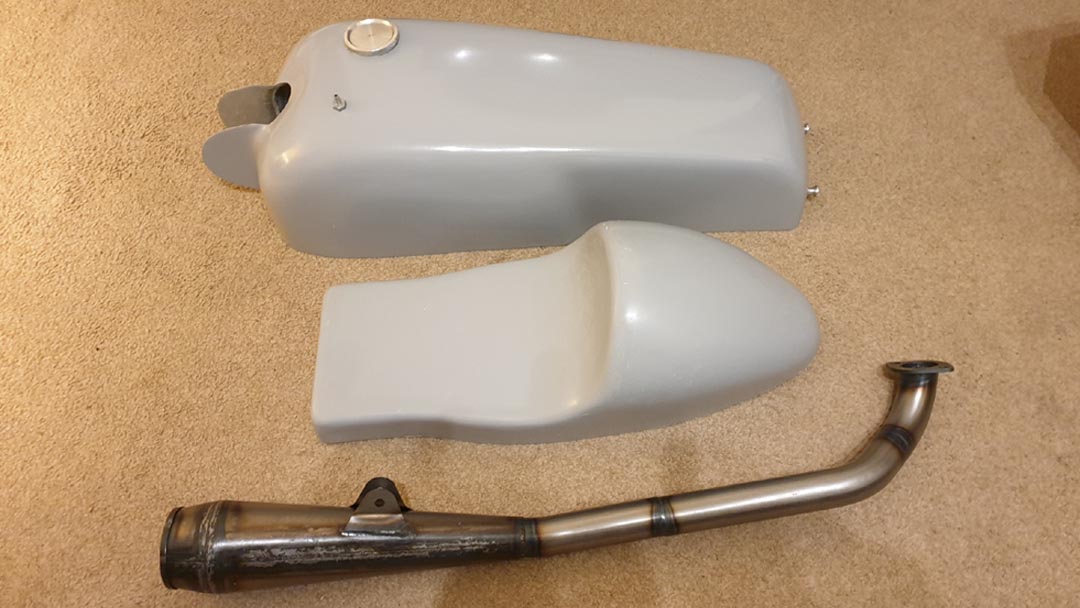
Previously ordered parts kept coming in ready for the big rebuild. Most exciting of all the important items from Italy - the race tank, seat and exhaust - finally arrived, and they looked great. Ok so the petrol cap wasn't the same as I remembered, and whoever welded the exhaust decided to put the weld on the megaphone on the outside where it can easily be seen. As for the tank this came with breather, two petrol taps and hooks for the rear strap. The biggest bonus was that the three items came to only £375 including postage, surely great value? I also managed to find a supplier on eBay, Pipe Werx, who made me a silencing baffle with a relatively large 69mm ID, because to run the bike without would just be too antisocial - as well as illegal.
Part 8
One of the problems with these bikes is that, although they're fitted with an electric starter, they're not very reliable. Apart from the original electrics themselves being a little suspect, the starters tend to break the teeth on the gears. This happens especially when the engine attempts to kick back, which can happen particulalry if the mechanically adjusting points backplate is stuck on full advance. Because my bike had now been fitted with electronic ignition this would no longer be a problem, but the starter was indeed knackered and needed to be replaced. Although repair kits were apparently available at a price, I found out from some very helpful Facebook forums that a US specialist called Ron Lancaster does a conversion whereby he fits a '76-9 Goldwing GL1000/1100 starter as a more powerful and reliable replacement, which apparently slots right in with the same size sprocket. So I sourced one from the UK for later fitment.
Meanwhile I had made the decision to use an 18" front wheel to match the rear, rather than the stock 19" version. I was going to just buy a replacement front rim until I saw some Borrani-style, flanged versions on eBay for a very reasonable price, even including postage from Italy. These were just what we used to use on the race bikes and would look great, while only around £30 more expensive in total than standard, non-flanged items. Since mine were somewhat pitted front and back anyway it was a no-brainer to replace them both, although still using standard widths of WM2 front and WM3 rear. So I took an angle grinder to the spokes, polished the hubs up and sent them to the UK to be built up.
Part 9
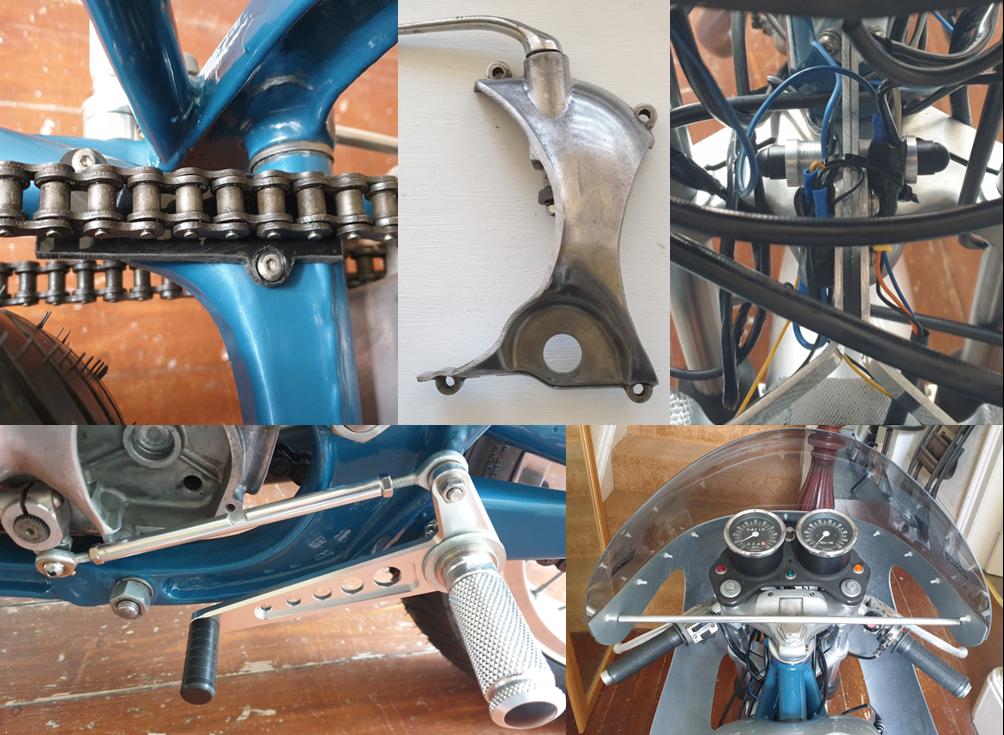
Time to start the rebuild! First the steering head bearings were refitted. I had found they were both somewhat notchy before I removed them but, once out, they were fine. When refitting the same thing happened when they weren't precisely square in the frame, but they freed up when properly aligned, something to look out for. Then it was on to the steering stem and forks, the latter given 6 fl. oz. of SAE 7.5 oil, and the swinging arm and new rear units. Next I removed the fibreglass spigots from the front of the fuel tank, and with trial and error progressively ground back the tunnel at the top to allow it to seat lower, alternating this with narrowing the mounting cross-member on the front of the frame til the tank slotted neatly over it, held in place by its internal taper. I also cut and glued a rubber to length to secure it at the rear. The only real problem was that the twin fuel tap mounts needed moving out and forward because the originals were for a race frame and positioned right over my frame rails. I then turned my attention to the race seat, fabricating four triangular alloy brackets that I bolted to the inside of the rear frame rails. Finally it was starting to look like a proper Aermacchi.
Part 10
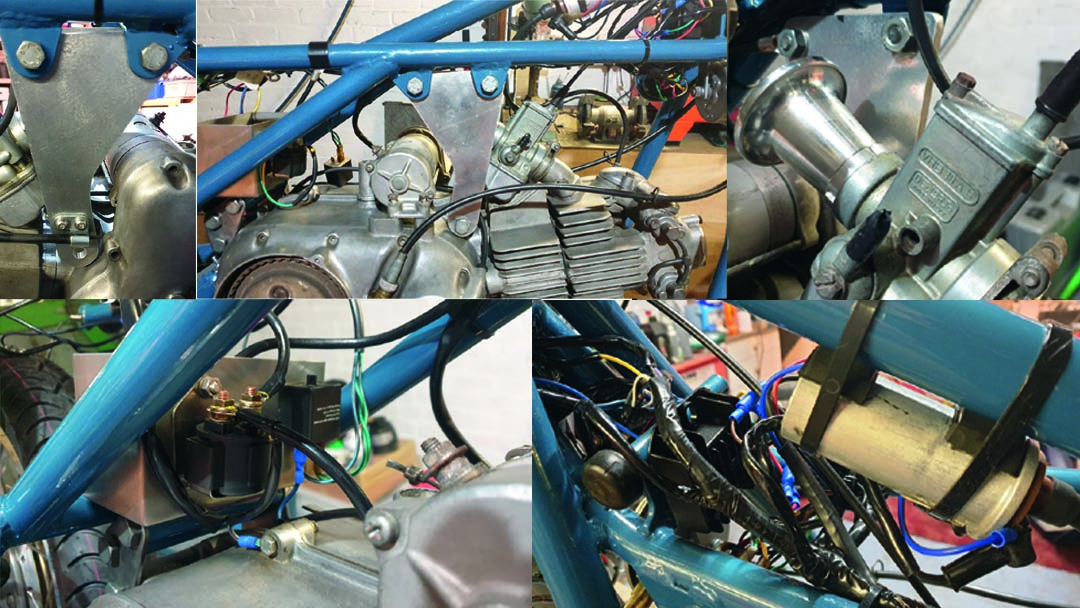
I fitted the wheels with Metzeler tubed ME22 tyres, because it appears they're now the only supplier with 18" 3.25 front and 3.50 rear options, and after overhauling the drum brakes refitted them front and rear. I mounted the alloy cafe racer footrests at the front of the passenger brackets, where there is already a hole on the right-hand side. I attached the rear brake cable to the rearmost hole in the matching alloy pedal, which just gave me enough free play, while the stop was formed from a long spacer bolted through the front hole. On the left-hand side I cut out and reshaped the spigot containing the splines from the original alloy gearchange pedal, and prepped a triangular bracket that I had welded to the top. Coupled with a new alloy linkage rod and 6mm rose-joints, this allowed me to fit the matching new pedal.
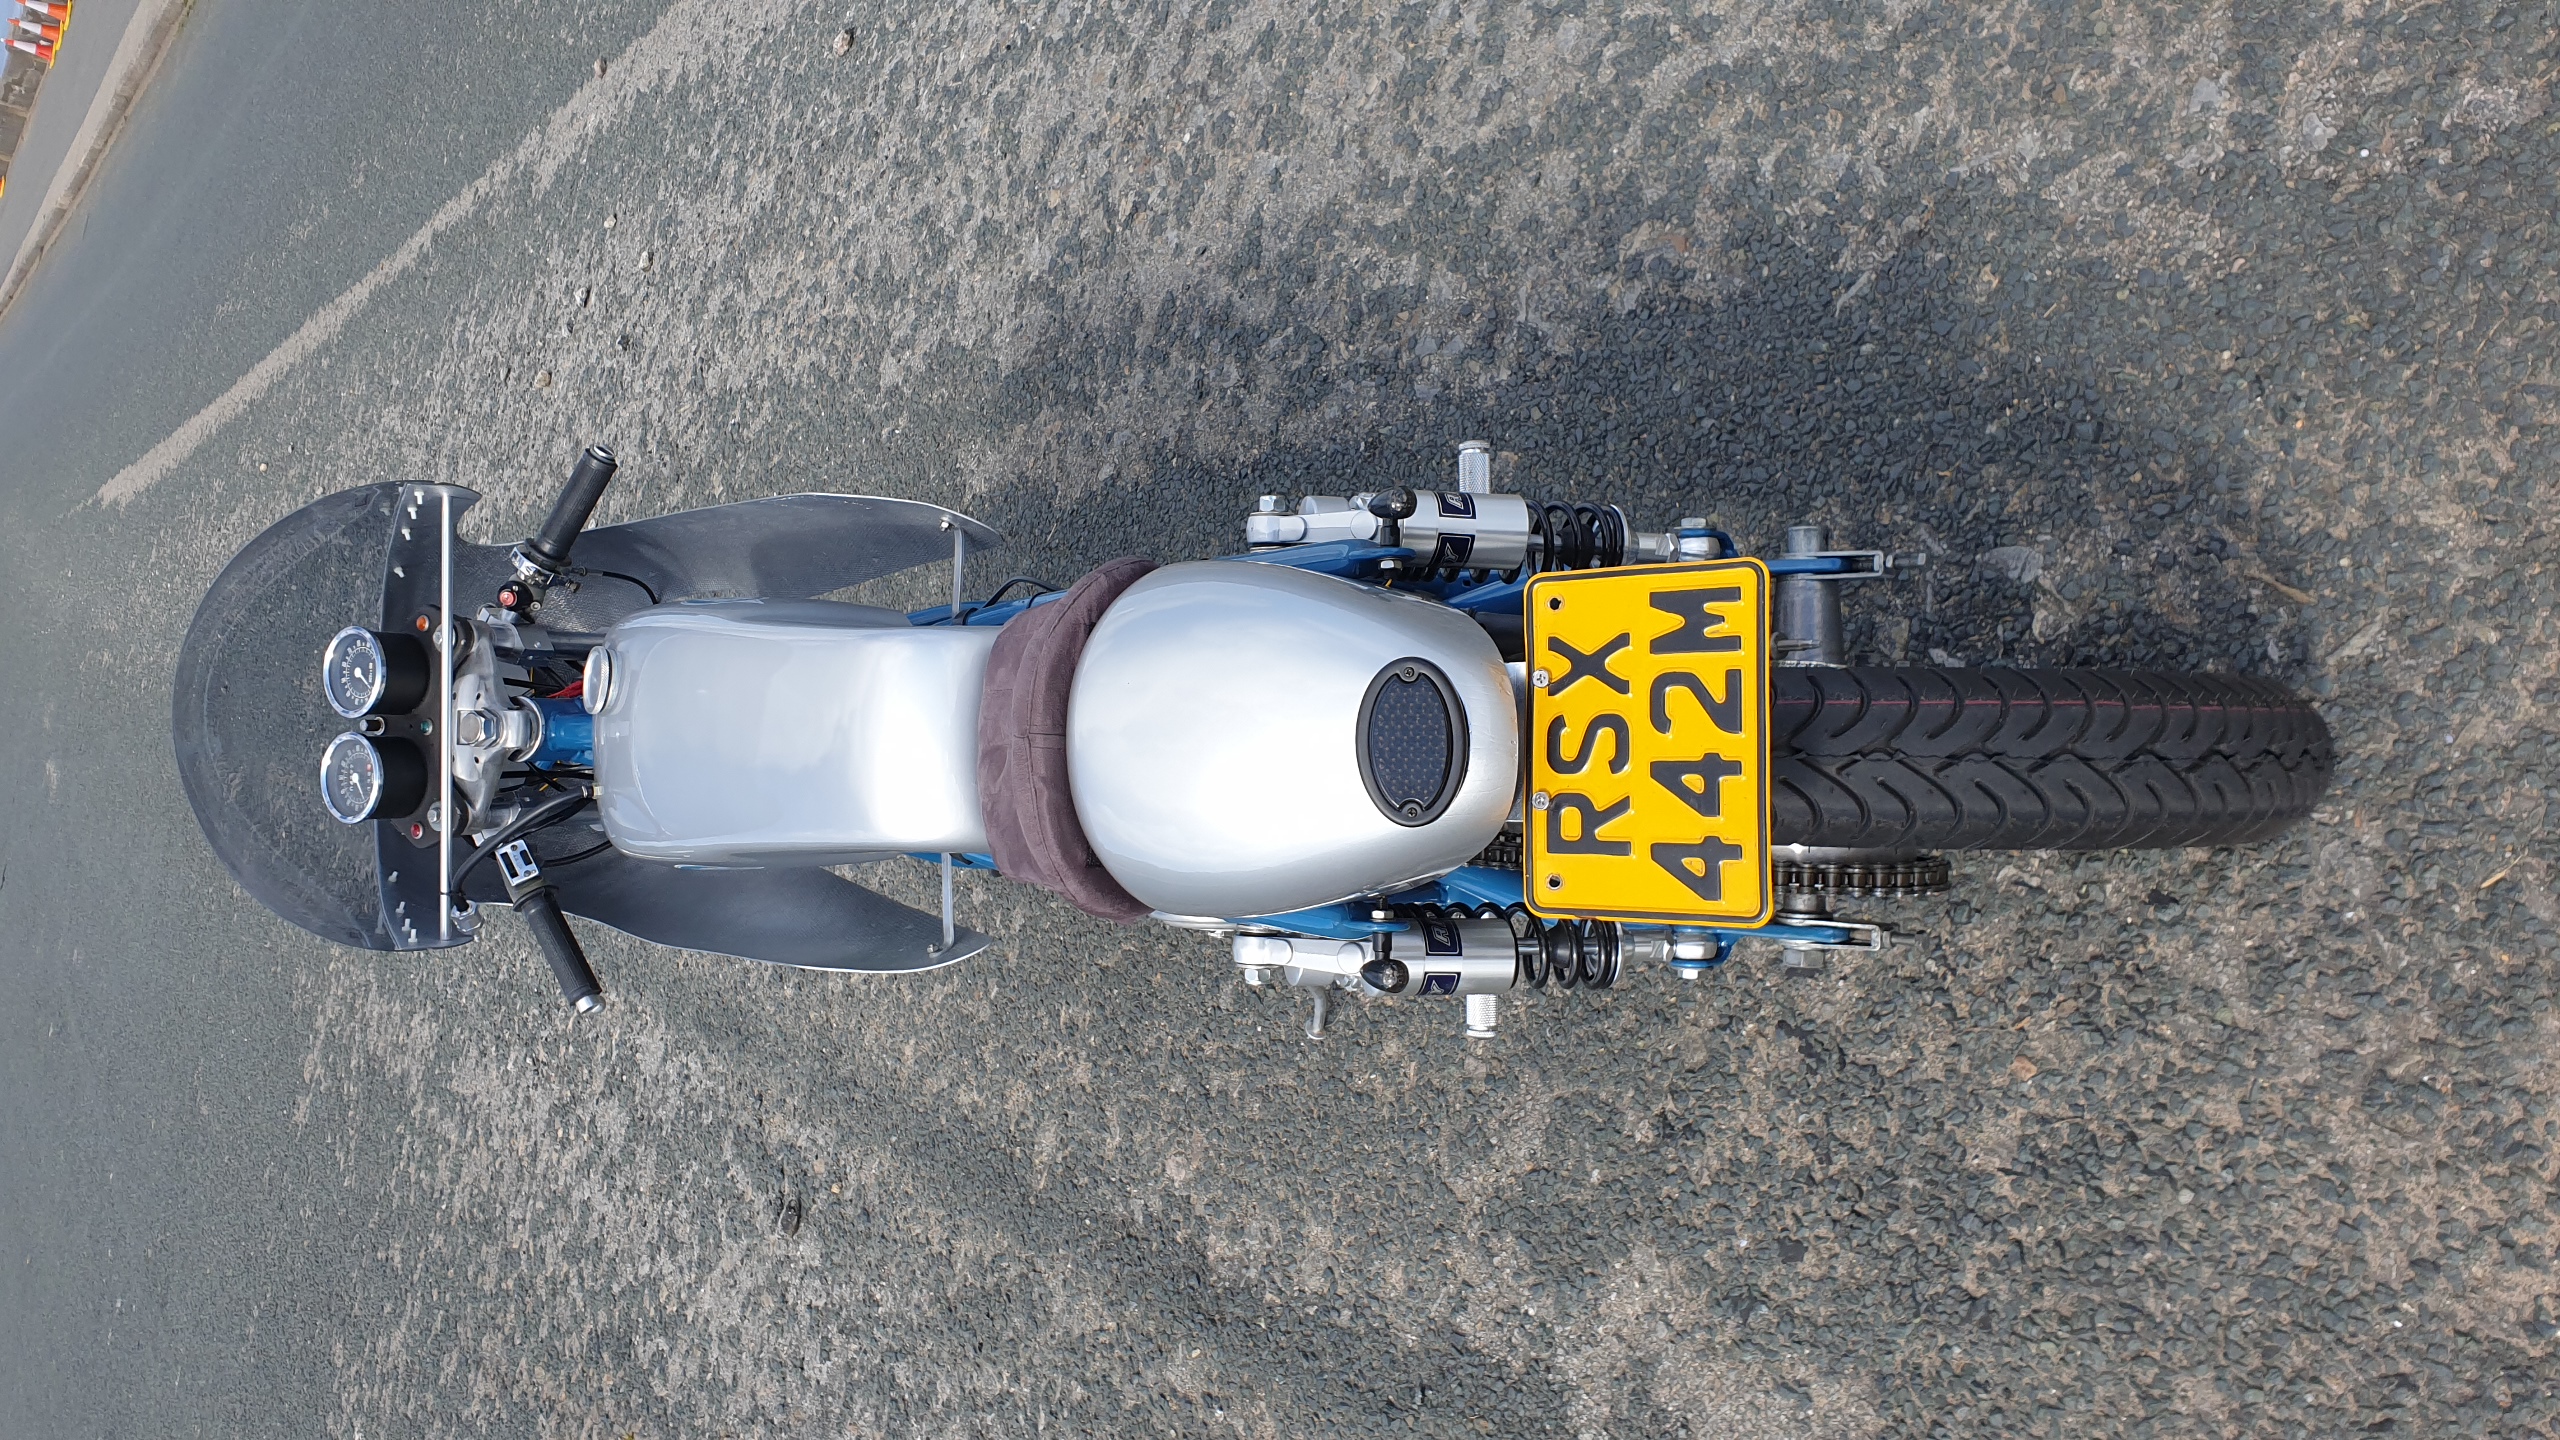
Then it was on to the electrics, with the old wiring loom cleaned up and re-taped where necessary, and refitted using the ignition barrel and its corresponding frame lug as a datum point to then run the other wires fore and aft. With the headlight and instrument cluster refitted, the former is somewhat in the way of the brake and clutch cables with the clipons at my favoured height, but this can be overcome. All the standard switchgear fitted neatly onto the new bars.
Meanwhile I rubber-mounted a universal, 4-wire, full-wave regulator-rectifier to the back of the horn mounting, because the original can be troublesome, and tie-wrapped the coil that came with the bike to the top frame tube under the tank. I also had an eBay supplier make me a custom stainless battery box for a very reasonable £25, which I bolted into the two original holes in the top of the rear engine plate gusset. On the outside of this on one side I velcro’d the Elektronik Sachse MP digital ignition system, code ZDG 3.12, which came with the bike and is a relatively expensive unit with 9 programmable advance curves with different characteristics. On the other I bolted a home-made alloy bracket onto which I slotted the rubber-mount for a universal solenoid compatible with the Goldwing starter.

Part 11
More work on the electrics. I modified the battery earth lead to fit onto one of the top engine mounting lugs. I was switching to small LED indicators so at the rear I connected up the rear brake and lights leads to each side so they will act as multi-function units. The fronts will have to be mounted when the half fairing arrives, but new earth leads had to be fitted for all four because the originals earthed through the frame. Meanwhile a new three-pin LED-compatible flasher relay was fitted to the front of the battery box, with the third pin connected to earth.
The engine was then re-installed. I have never liked the upper pressed-steel engine mounts used on this and earlier road Aermacchis, so I hand-fabricated shaped replacements from 8mm flat alloy plate and added extra spacers to the bottom bolt. The rear mounts were simply stripped back to bare metal. The alternator and electronic ignition wires were reconnected, ditto the rev counter and throttle cables, all with no problems - except for the latter being somewhat too long.
Part 12
Moving on to the race exhaust, unfortunately when I offered it up I found that the positioning and depth of the head studs is completely different on the road as opposed to race engines, so I had to carefully cut off the lug and have it rewelded in the correct place, along with using spacers on the longer studs. Once that was sorted I found it hung down way too low, so I removed a v-section from the centre and again had it welded up. At the rear I made up a rubber-mounted bracket to fit onto the rear of the footrest, while I bolted the separately sourced baffle into place in the interior and gave the whole thing a coat of satin-black exhaust paint. With this race exhaust and the addition of a beautiful alloy bellmouth with gauze, again sourced easily and cheaply from eBay, I increased the main jet in the Dell'Orto VHB 30 carburettor from 115 to 130 - although I bought a full set of jets so will be able to have fun experiment with plug-chops up on the mountain.
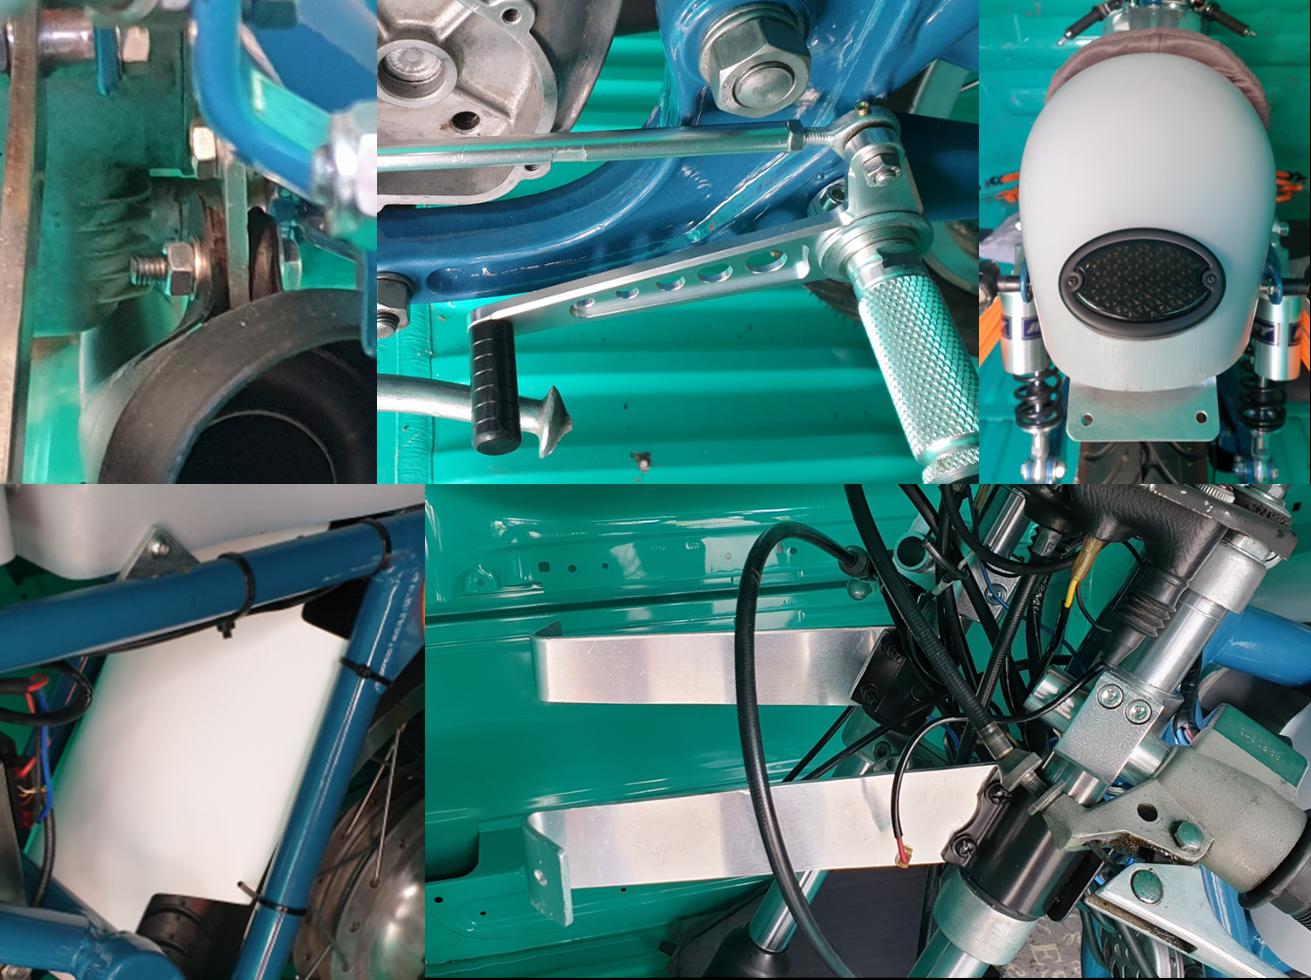
I also made up a gearchange linkage with rose joints for the rear-sets, which will retain the one-down, four-up layout; mounted an LED rear light in the seat, coupled with an aluminium number-plate mount; fitted a fibreglass, race-style, rear mudguard; and fabricated a pair of aluminium headlight-cum-fairing mounts, attached to the forks with cut-down universal headlights brackets.
Part 13
More bodywork has now been completed, mainly using 1mm or 3mm aluminium plate. Starting with a small L-shaped stop for the rear brake pedal, before moving on to more complicated front mudguard mounts that I mocked up in cardboard first.
Then it was time to return to the fibreglass race tank. First of all it needed to be lined to stop the additives in modern fuel eating it from the inside. Based on recommendations I used Caswell, although it's quite hard to locate in the UK. However the mixed liquids are very thick and, despite moving the tank around constantly for 30 minutes to spread the sealant as instructed, when I removed the cap I wasn't entirely convinced it had worked its way all over the central section that sits over the spine of the frame. So I reluctantly ordered another batch (at £50 a time!) and attempted to make sure I rectified this second time round. I can't try and harder to make sure it's properly sealed so fingers crossed.
As for the tank mounting, I found that using just a thick rubber band at the rear as per the race bikes was allowing it to ride up at the front, so a rethink was required. Then it occurred to me that I could use the original petrol tap inserts to mount an L-shaped bracket onto each side that could be bolted to the engine plates. With the tank still resting on rubbers on the frame front and back, this made it wonderfully firm. I will try it without rubber mounting to start to see how it goes. Then of course I had to drill the tank for the new taps placed further forward to avoid the frame rails. Having had the appropriate threaded inserts made up, these were attached using Araldite, and the appropriate fuel and breather hoses were cut to length.
Next it was time to fit the 160mm LED headlight and beautiful half fairing. I excavated a hole of approximately the right diameter and continued with trial and error until the light was a snug fit, before bolting the latter between the front mounts. The fairing was then offered up again, and appropriate holes drilled each side. Smaller holes were worked for the indicators, which were also bolted to at the main brackets. As for the fairing sides I fabricated two further brackets to match, this time bolted to the engine plates.
Part 14
It was now time to return to the thorny issue of the starter, and it was sufficiently complex and long-winded that I've prepped a separate report on the procedure and problems encountered here.
Once the new starter, inner left-hand cover and alternator were back in place, I cut down the outer left-hand cover so that only the clutch operating arm remained (as we used to on our race bikes). The new rear-set gearchange could then be properly positioned, and was found to be only working with the short arm on the splines pointing downwards and vertical. Meanwhile I made up a nylon plate to protect the swinging arm from the chain. The left-hand fork was also found to be leaking from the base, not the drain screw, so now the bike was no longer on a workbench I made up a wooden stand to chock the front wheel in the air and after removing the front wheel the offending damper tube bolt was removed with a long extension to an impact driver (to avoid the damper rod simply rotating), the copper washer inspected, showing no problems - so the bolt must have been loose. While there I replaced the oil seals in both forks with universal 30mm ID 40mm OD items.
Worst of all a friend now pointed out a terrible, 'page 1 para 1' mistake I had made at the front end. Can you spot it in the pictures above? Yep, that's right, I had been so used to attaching headlights to cafe racer forks that I had attached the fairing to the headlight bracket as well - meaning, of course, that the fairing would attempt to twist as I turned the bars. How could I have been so stupid! Ok, so having the bike strapped into my van so the front wheel couldn't turn didn't help me to spot the mistake earlier, but that's really no excuse. So I set about redesigning and extending the fairing-cum-headlamp mounts, and drilling and tapping the headstock. Panic over. At the same time this allowed me to set up a proper steering stop bolted through the new bracket.
More bad news was to come though. With a new, lightweight, Skyrich LTM14B lithium battery in place I found I had no spark. The bike had been running fine before I bought it, so I checked the wiring to the coil and it wasn't right. Assuming I hadn't properly copied how it was before, I rectified the mistakes... and still no spark! That left the coil, HT lead, spark plug and cap, all of which were replaced at relatively little expense (Lucas 47276 and NGK B8ES for reference). I also checked the voltage feed to the coil - fine, and the continuity in the electronic ignition module - again fine. And... still no spark! Desperate, I contacted Marco at Elektronik Sachse, and he was really helpful, giving me another test to perform that indicated I had blown the output from the ignition unit by initially wiring it up incorrectly. Within 10 days he had repaired it and sent it back at reasonable cost and, at last, I had a wonderful, fat, juicy spark!
In the meantime the bodywork had all been sprayed locally by Tom at Autobodies in Regaby, and the bright silver looked superb. It was all fitted on the bike, including the smoked screen that was supplied pre-drilled, and it now looked like a proper motorbike for the first time. However I felt the screen was too high and narrow so a friend made me up a cross member to widen and lower it. Also on a positive note the replacement starter was working fine, as was the headlamp. The LED indicators were too, but all flashing at once, requiring the insertion of a diode in the wiring to the indicator warning light.
To get the bike ready for its first fire-up the oil was drained and strainers cleaned, then it was topped up with 2.5 litres of Morris Golden Film Mineral 20W50, and the tappets correctly set at 0.002 inlet, 0.003 exhaust (checked at TDC on the compression stroke). I also noticed that, despite my best efforts, the front brake was still useless, even when just pushing the bike around, so the shoes were sent back to the UK to be relined with race material.
Part 15
When the big day came the bike started remarkably easily and the exhaust sounded terrific. With no cover the dry clutch jangled just like our old race bikes used to, and similarly on the left the rotation of the alternator reminded me of the old outside flywheels. Then I ran it up the road. The gearbox worked ok, and the riding position wasn't too bad, but the front brake was still non-existent despite new shoes and, coupled with a seriously grabby clutch, it made for a rather less than enjoyable experience.
Starting with the brake I rode up and down jamming it on and off until eventually I had something, but it still wasn't much good. Then my brother mentioned he thought the operating arm on the back plate was only starting to operate past it's fulcrum point, so the broken bolt on one side of the bottom adjustable nipple had to be drilled out and tapped to allow the lengthening of the cable, this in turn meaning the operating arms could be rotated anti-clockwise one spline.
In the meantime the brief ride had shown that both fork seals were leaking badly, so the front end had to again be dissassembled. Universal 40 x 30 x10 mm seals were easily obtained from eBay, but initial reassembly showed that one leg was horribly pitted underneath the rubber boot - it had obviously been left standing for some time with trapped water inside. I managed to locate a great source of road parts in Germany, Rudolf Jungjohann (aermacchi@web.de), who was more than helpful and reasonably priced, but it was several months before I could justify the further expenditure on a new tube. Then, when it did arrive, the damper body was ridiculously tight in the old leg - serious heat showed it had been glued in place. It was then found to be loose in the new leg, so araldite was applied. Although the technical manual says nothing whatsoever about this, this damper body is basically what stops the slider from slipping off the tube (there is a snap ring but it's hardly that effectual), so it's pretty important that it doesn't come out.
With the front end reassembled it was time to turn to the clutch. I already knew that the nuts had been secured with locktite or similar, which is absolutely not necessary even on a race bike, and were ridiculously tight. They have a slotted head, but even after grinding out the centre of a large flathead screwdriver with a square shaft on which a spanner could be placed, they still refused to budge. Eventually I had to shape a punch to rotate each nut a tiny amount at a time. It took hours and actually removed all the studs with the nuts, that's how welded on they were. I then replaced the studs, nuts and plates (sourced again from Germany) and have a nicely operating clutch.
The main problem now is that the bike sounds great and rides quite nicely, but is fairly slow, so a larger carb as a minimum will be the next step.