
CB500 CAFE RACER
To listen to a brief clip of the bike being revved up, click here.
Stage 1: The Purchase
I've always wanted a Honda 500-4, whether to race or to ride on the road. And for years now I've had a real itch to get my hands dirty again after so much sanitised work at a computer - apart from thinking it really is time for me to cock my leg over a bike again after an absence of more than 15 years. And biking is pretty spiritual anyway - Zen and the Art of Motorcycle Maintenance wasn't a classic for nothing.
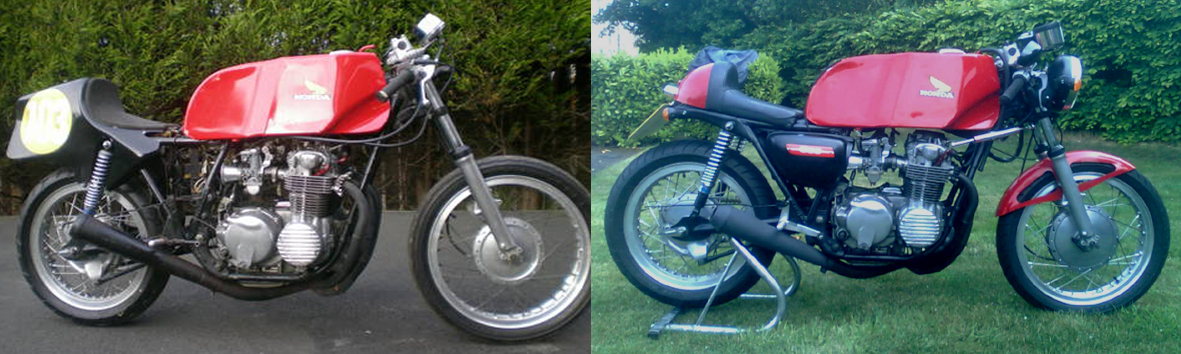
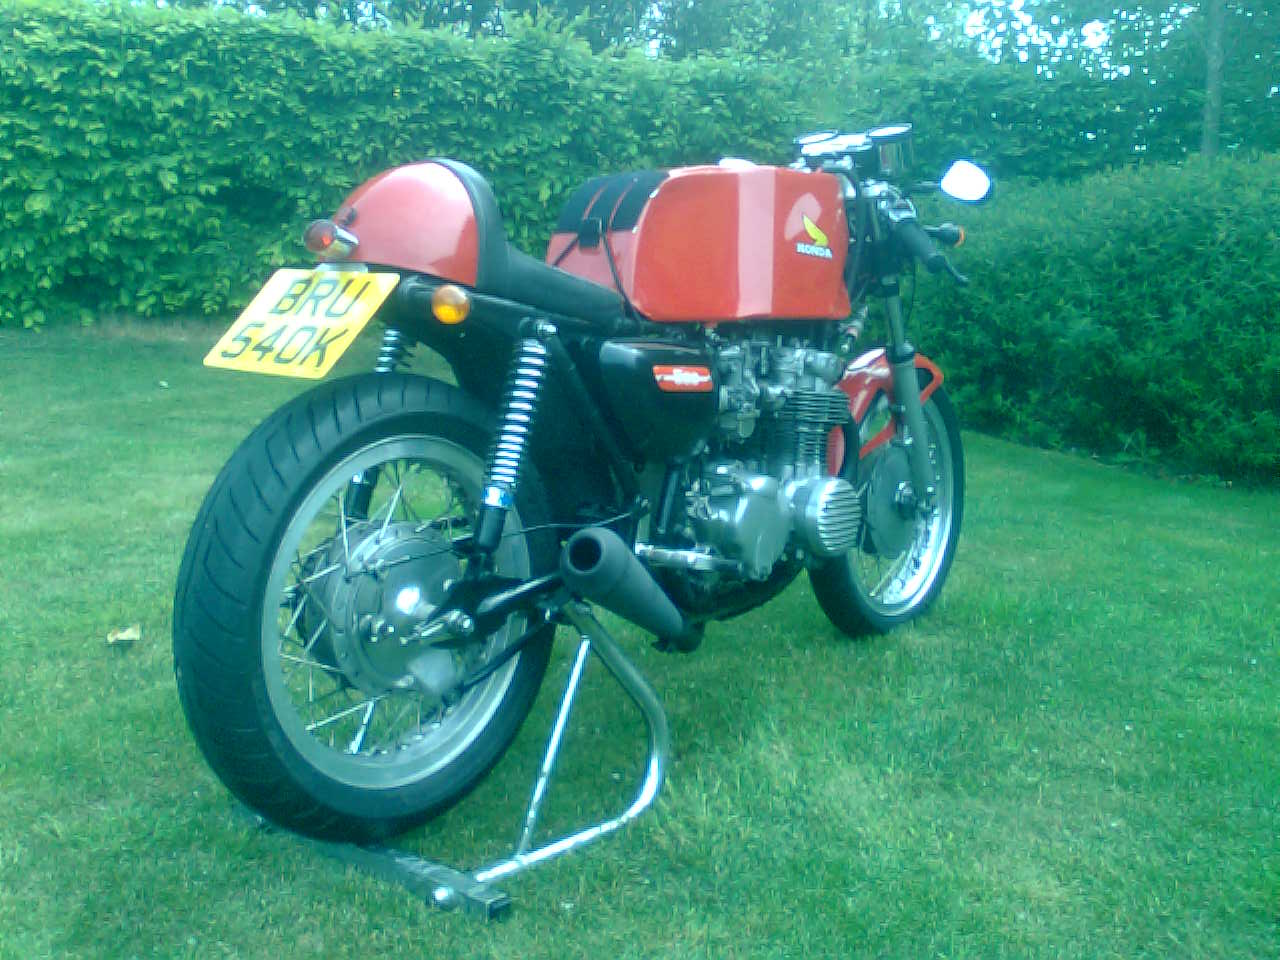
So when I stumbled across this bike on the net in August 2009 it seemed the ideal project for a cafe racer. Many years ago I had converted my Derby Racing Services framed 1000 Genesis Yamaha racer into a street bike, so this would be a good test to see if I could remember anything. It was listed by a dealer in Sunderland, and we soon agreed a price of £910, sight unseen.
Little of the bike's history was known, except that is was sprinted in the late 90s, and the engine was supposed to have been running fine at the time. However it had not run since due, apparently, to faulty electronic ignition. A new Boyer Bransden unit was supplied with the bike, but had never been fitted. The engine was thought to have had some modifications, but no details were available.
When it arrived by courier after an anxious 10-day wait it was not in too bad condition. The frame was a little tatty and rusty in places, and the high capacity alloy race tank seemed to have been recently resprayed, although the extensive filler marks indicated a chequered history. The wiring, such as it was, was very tatty indeed. The clutch lever was missing, otherwise she seemed pretty complete.
Stage 2: The Strip Down
Down to business! With no workshop facilities I was forced to work in the parking space outside my flat, so sore knees were the order of the day - but at least it stayed dry for about a month.
The first thing was to establish exactly what the bike was. A check on the engine no via the SOHC4 website quickly revealed it to be from a CB550 K2 dating from 1976. Initially I couldn't find the frame no on the steering head but later, just before respraying it, I caught site of a faint set of numbers. Rubbing the original paint away revealed the frame is from a CB500 K1 dating to 1972, again checked here.
The bike was stripped right down. The tatty race seat was junked, as was what little wiring remained. Closer inspection revealed the engine turned over fine, and although the oil must have been ancient it was relatively clean. However the rear wheel alignment was a mile out, and the chain was solid. In trying to sort this out I realised the bike was on higher than standard gearing, and the chain was too short so there was no adjustment left.
The frame had had many of the standard lugs removed (eg for centre and side stands etc), as one would expect. However a monstrous iron hoop had been welded on to act as a seat support, which was not even square/straight. A similarly tatty front fairing bracket with stays to reduce the steering lock had been welded to the steering column (made out of the same angle iron as a quite grotesque, home-made, rear brake lever). I got my first experience with a borrowed angle grinder to remove said appendages. Due to the tight space with the forks still on, the fairing bracket and stays had to come off in sections - and when the blade picked up when I was nearly through the first cut it almost wrenched my shoulder out of its socket. I can't believe our nanny state allows idiots like me to use these things, they are deadly and need to be treated with serious respect!
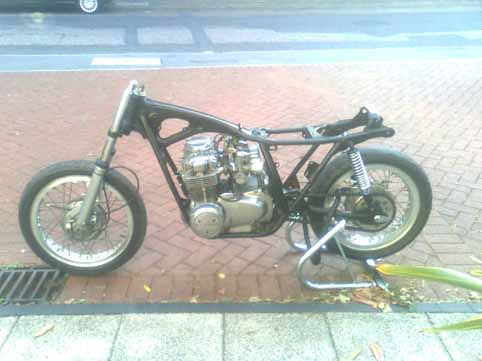
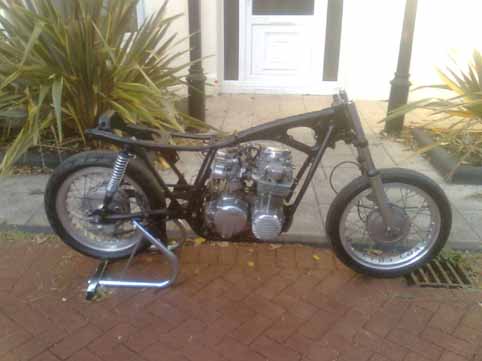
If the bike proves good and reliable it may deserve to have the frame bead-blasted and powder-coated at some stage, but for now I spent several hours rubbing it down, masking off the engine and forks, and giving it a coat of Halfords satin black spray - which produces a really excellent and quick-drying finish.
Stage 3: The Electrics
Transfer to my flat, and one of the massive advantages of being single - the wiring loom and all related electrical gear could be spread out on the kitchen table and living room floor, to stay there for as long as it took. This reminded me of putting new pistons and rings in my TZ350 every couple of meetings back in the 80s - also on the kitchen table in my flat in London.
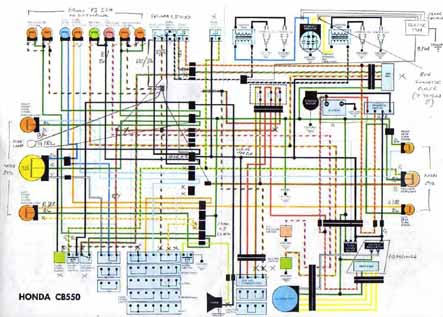
I started with a brand new wiring loom for a 550 (I didn't know the frame was from a 500 at this stage), sourced from the classic Honda specialists David Silver. It was expensive (the full breakdown of costs is at the bottom), but for someone as useless on electrics as me it would be vital that this was a reliable, known commodity that matched the official wiring diagram.
Strangely enough no one had removed the starter motor, but I was able to find a s/h alternator stator/field coil via EBay - a fantastic source for most of the parts, although this one had to come from the US and was made much more expensive by postage. The front and rear lights, indicators and relay, and ignition switch, were all sourced cheaply as aftermarket items. The left and right handlebar-mounted controls were not easy to find at a reasonable price, but a good s/h set from a 400-4 were located that seemed pretty similar. I later found there are some differences in the detailed wiring though.
I also had to source a s/h electrical mounting plate with main wiring connectors and starter solenoid. This was stripped and repainted, along with the battery holder, again using satin black. A new fuse box and battery was sourced, along with a combined solid state rectifier-regulator combo from the US - a common modification. Again all of these were for a 550, although I'm not sure there are too many differences from the 500. I decided not to fit the neutral/side stand switches and related starter safety unit, because if these go wrong they leave you stranded. And hopefully I'm not completely brain-dead just yet.
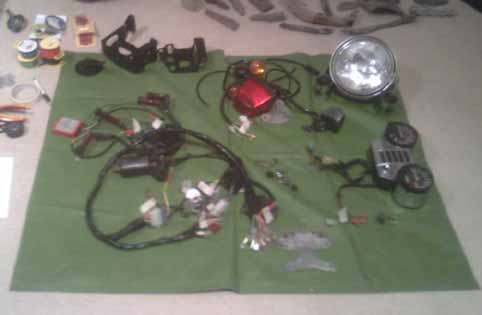
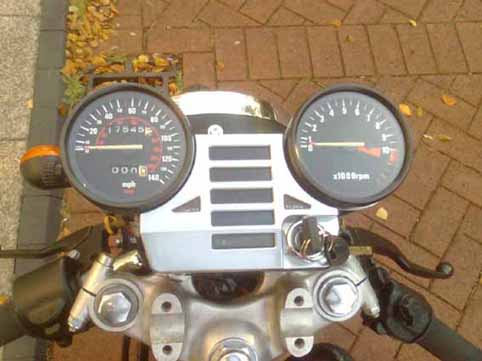
The most major change was the speedo/rev counter/warning light unit - this fantastic, space-age looking assembly caught my eye on EBay and I had to fit it, no matter how complex things might become because it was from an 83 CB550 Nighthawk. The rev counter on this is electrically rather than cable operated, but I remembered that running a wire from the coil pulse wasn't a problem on the old man's Aermacchi race bikes. It also has a hole to mount the ignition switch and key, so the relevant wires in the loom had to be extended past the standard fitting location by the front down tube.
Once I had done everything I could and prepared a list of the things I still didn't understand, I called in a local auto electrician to go through them. It cost a bit for 3 hours advice but it was well worth it. I also recommend amending your wiring diagram so you are absolutely clear about non-standard components with different numbers/colours of wires.
Stage 4: The Chassis and Components
The bike came with non-standard wheels. Finding out exactly what they were was something of a nightmare, but in the end I established that the 18" WM2 on the front was laced to a twin-leading-shoe drum from only a CB175 - difficult to know why this replaced the standard disc apart from you don't need to stop so much in hill climbs - and the much wider 17" racing rim on the back was laced to a CB500-T hub (for the CB500 and 550 both wheels were 1" larger in diameter). I fitted them with Avon AM26 Roadrunners, with a 90/90-18 on the front (which still presents a very steep sidewall on the WM2 rim), and a 130/70-17 on the rear, using pressures of 26 and 29 psi respectively. It also came with an 18-tooth gearbox sprocket, so a 17-tooth standard one was fitted. It has 39 teeth on the rear, 5 more than a 500 and 2 more than a 550, but I will accept the lower gearing for now. As far as I can tell from my calculations the standard 550 was geared for only 101 mph at 8500, while this gearing will give me 99 mph at 9000 - that is if the engine mods, whatever they are, will pull the extra revs.
A pattern clutch lever was sourced, together with a drum front brake lever assembly from a modern Royal Enfield that has an integral brake switch - EBay again. The gear change pedal had simply been reversed on the splines to point backwards instead of forwards, and I am ok with an "up for down/down for up" arrangement - plus I did not want to spend out fortunes on a proper rear set linkage. However the bends in the pedal meant it was sticking right out to the side, so a good friend cut and welded it so it was straighter but about the same length between centres. A new twistgrip was fitted, and all handlebar and foot lever rubbers replaced with new universal items.
The rear brake lever was a beautiful, new item sourced at an autojumble - it doesn't get much better than spending a whole day rummaging around in hundreds of boxes of bits hunting for rare or bargain parts. Here I also sourced the bronze bushes that allowed the brake pedal to rotate around the shortened footrest, instead of being mounted as previously on a separate bolt through the rear-set plate. I did not bother to create a stop for the pedal, or to connect up a switch, as I rarely use the rear brake anyway. The silencer was also an aftermarket item, similarly sourced, and it fitted neatly onto the single outlet pipe of the 4-into-1 exhaust (maybe I will have the long-dreamt-of 4 pipes one day, but not yet). All that was needed was a slightly larger clamp, and some reworking of the stay that was attached to the chassis via a bolt through the rear set plate. The silencer were beautifully chromed, but as this is not that kind of bike I had to have it dechromed by a local specialist before I could spray it black with high temperature paint.
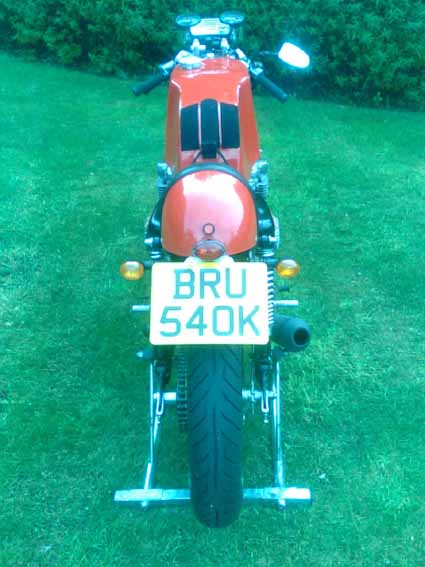
The tank was properly fitted, with a new foam pad across the frame at the rear, and padded out front rubbers. It had no fuel taps so 1/4 BSP taps with filters and unions were sourced from a local British bike shop - although one had to be replaced as the thread peeled straight off. A straight-through breather pipe was fitted, along with two new fuel lines - in fact, because each tap only feeds one pair of carbs, a third pipe was connected between the two so that the reserve tap can remain off until needed. The 350 K4 racing seat and TZ-style front mudguard were sourced from the manufacturer, Bill Roberts in Basildon (01268 726571), although they are also available from Hales Honda. The number plate mounting was adapted from the rev counter mounting supplied with the bike, and was bolted to the back of the rear light unit. Finally, to protect the electrics, pattern side panels from LPM were fitted, using a set of original rubbers sourced from EBay. No prizes for guessing what colour they were sprayed.
A s/h side stand from a modern 400 Honda - not sure which model - was found on EBay. It came complete with its bolt-on mounting bracket and stop, and was fitted via two holes drilled in the centre of the left-hand lower frame rail - slightly off from the horizontal to give the correct angle of lean. Some filing of a fibre shim was required to take up the play in the mounting bolt/plate around which the stand lever swivels, while slices of a hardened plastic kitchen cutting board were cut and bolted to the base to give adjustable height and a wider footprint.
The bike had no plugs as supplied, so NGK DR-7ES' were fitted, while in the absence of a proper air filter stainless mesh was cut out and glued to the four carb bellmouths. One finned exhaust clamp was missing, but I found a whole set of 4 plus collets, all in excellent condition, from a 400-4 that are identical. I also decided that a steering damper might be a good idea in case this bike had any tendency towards the high speed hysterics of Mike Hailwood's works 500 from the 60s. So a modern, hydraulic, race item was fitted via the bottom yoke at the front, and at the back via a hole drilled and tapped into the right hand downtube. All these items were again cheaply sourced from EBay.
Stage 5: The Big Fire-Up
When the great day came to fire her up for the first time, I was of course very excited. I had had the new battery on trickle charge all night, and fitted it that morning. Then I turned the engine over on the starter motor with the plugs out to circulate the oil properly after all this time. I didn't even forget to put some fuel in the fuel tank, and to turn the taps on. Plugs greased and screwed in... checked all neighbours out - they have been great, all enquiring on progress, as has anyone just walking down the road because she does seem to be quite eye-catching - but this time I want to be alone just in case it is too noisy or, worse still, makes all the wrong noises... turned the ignition key to "on" and the emergency switch to "run"... pressed the starter button and...
Nothing... zip... just the engine turning over with no spark at all on any cylinder. Hmmm... how embarrassing, and disappointing. Never mind, back to the drawing board. I assumed my pathetic understanding of electrics had led to a faulty wiring in of the electronic ignition.
I had to wait nearly a week for my friendly electrician to become free, and after some time he diagnosed that both coils were dead as doornails. So a new pair were ordered from a company in south Wales and, when they arrived in a couple of days, again the excitement mounted. But again, nothing... no spark at all. In fact, following the electrician's phone advice, I couldn't even get a spark at the plugs when by-passing the wiring loom completely, by connecting one terminal of each brand new coil to the positive side of the battery then earthing the other one. This was very frustrating, and not making a lot of sense to either of us.
It was another week before he was free to visit again, and in the meantime I had done lots of positive thinking, imagining the bike starting and running well - plus of course this has all been pretty good for my development of patience as well. So we went to work again and this time, knowing the coils must be ok, it took him little time to suspect a poor main earth from the battery negative to the frame. Sure enough, although this was how the bike had been set up previously and it all looked perfectly ok, when we filed the connector and repositioned it on a nicely unpainted bit of frame, lo and behold - a spark! Not a very bright one, but a spark nonetheless. Everything was connected up again, fuel taps on, several deep breaths and... nothing much...
She was trying to fire, but no amount of throttle priming was doing the job. One plug out, completely dry, no smell of fuel anywhere. So off I went to the petrol station, can in hand, for another gallon. Back I came, petrol in, tried again and... still the same! Boy was this getting frustrating. But then I remembered that, having stood idle for over ten years, the carbs and jets were probably badly gummed up. In fact I had bought a can of carb cleaner precisely for this eventuality, but had assumed I would have to at least get her running for it to be of any use. But now I fetched it down in desperation and, engine off, we sprayed it into the bellmouths with the throttle held wide open. And this time when I turned her over she started to cough and splutter, making a real effort, and gradually she came to life after all this time!! At first she was running very rough, and pretty much on the carb cleaner alone, so she soon stalled. But another heavy injection of cleaner brought a gradually smoother tickover. In fact considering the state the carbs must have been in, and that the ignition timing was only roughly and statically set, she was running fantastically well. Of course smoke was billowing from the newly sprayed exhaust, and I burnt my hand tightening up the exhaust bolts because all four pipes were blowing a little at the head. But as she settled down and warmed up, just a little tweak of the tickover adjuster and she was idling pretty well. And as a real bonus the rev counter was working too!
But the best bit was yet to come. I have always been taught to be scrupulous about letting a bike warm up properly before revving it, especially when it has been standing that long. But now she was warm enough. We could already tell just at idle that she sounded pretty mean, but a few blips of the throttle and we were in heaven. Not only was the response crisp and swift, but what a note!! I could not have asked for a better silencer, which works well enough to ensure she is not a complete, antisocial monster, and yet retains sufficient of the throaty roar of a 500-4 to warm the cockles of any true biker's heart. In fact she sounded so good I made a brief recording so you can enjoy it as well (see top of page).
Stage 6: The Test Ride(s)
Before I could sensibly take her out, I had to check the tappets - some of which were quite loose - and change the oil and filter - which of course was filthy. In fact because of work commitments it was nearly another week before I could do this, so we were now at the end of October. At the same time I realised that the leak from the exhausts had been caused by there having been no copper gaskets fitted, so these were ordered and luckily arrived the next day.
Luckily it dawned fine, so I donned the old black race helmet - don't want to attract attention with the snazzy new red and white gear before she is registered and taxed - and fired her up. She seemed a little reluctant to start again, and quite uneven on tickover, but that was not important right now. After a decent warm up, off I wobbled. Clutch and gearbox seemed fine after a slightly crunchy start, but again that was probably to be expected after such a long lay-off. As for the suspension, I had done my static checks of front forks - seemed well damped and reasonably soft - and rear Hagon shocks, which seemed pretty hard until I adjusted them to the softest setting. Nevertheless my local roads are extremely bumpy, not helped by me finding some minor roads I didn't even know about in my desire to stay off the main ones. So I was getting a right hammering and, coupled with the leaves on the road and me only wearing overalls, this was not a time for heroics.
It was great to be back on a bike even under these conditions though, and of course I had to open her up properly when the road was clear. She was still making a terrific noise, but not getting anywhere all that quick! Of course I have never ridden one before so don't know exactly what to expect, but she seemed a little sluggish, as if not carburatting brilliantly. As for the front brake, although the lever was full enough, in terms of actually retarding progress it was about as much use as a chocolate teapot! Of course the shoes had glazed with age, but even though I rubbed them down with rough sandpaper they were not much better, so they were replaced. And when I got back the headlight was pointing at the floor, although I had already suspected that I might have to sleeve out the rubber front indicator mountings that combine with it in order for it to do up properly.
All in all it, though, it could have been a LOT worse. It was only niggling things that needed to be sorted out, which was only to be expected. The main thing was to remove and clean the carbs, and inside the float bowls was a mixture of ingrained and floating grit and gunk that made me wonder how she had run at all. The main and pilot jets were removed and cleaned, and the pilots seemed to be blocked - which would explain the unevenness low down - so were boiled in a saucepan for 10 minutes, a trick gleaned from the net, which seemed to work pretty well. The sizes were also larger than standard, at 120 (instead of 100) and 45 (instead of 40) for the main and pilot respectively, but this is fine in the continued absence of an airbox. After this she ticked over really quite well - just a bit lumpy, but this was improved when I got hold of some vacuum gauges and balanced the carbs up, all four needing a significant increase as well. A strobe was also acquired so I could check the timing dynamically - she was just slightly retarded as I had set her. In any case, at higher revs she was now roaring like a lion, turning heads everywhere - not so good while she is still illegal - really accelerating quite hard and pulling well, although exactly what revs I didn't know because the nonstandard electronic rev counter from the CB550 Nighthawk was registering double for some reason. This will have to wait to be sorted.
Another problem that reared its head was cold starting. Repeatedly it refused to even try to fire until I had sprayed neat carb cleaner into the bellmouths. The choke flaps had been removed for racing, so when a decent set of similar carbs with chokes for a 500 came up on Ebay for a reasonable price they seemed like a good investment. Not only was I able to swap the chokes across (this does require separating all four carbs but it gave me a chance to clean them properly), but now I have plenty of carb spares as well (see footnote for cautionary tale though).
Anyhow, what a great feeling it is, now I am getting a little used to riding a bike again, although from the wear area on the rear tyres my angles of lean still need a lot of work ;-) But hey, it's fantastic and all good!! I am going to have a lot of fun next year...
Stage 7: The MOT
After a very busy winter and spring, with the bike securely tucked away in a friend's garage, it wasn't until June that I had the time to take her for an MOT. She failed honourably, although not for exhaust noise (the tester told me he had to compare it to standard, and since he'd never heard a standard one he had to pass it ;-) and not for the pathetic front brake. Apart from the need for a reflector at the back and the headlamp brackets to be beefed up, main issues were a leaking fork oil seal - which I was intending to sort anyway and both were replaced - and the wheel alignment. Unfortunately the steering head seemed to be bent, but the handling didn't seem too bad on both sides so I had left such a major strip down job. Also I had been messed about on the alignment by the large rear sprocket meaning I was running out of chain adjustment, so before doing anything else I purchased a much smaller 33 tooth rear. This raised the gearing considerably (now geared for a top speed of 115) but it was clear from the slightly longer run to the MOT that she needed that anyway.
Although not for the MOT it was also now clear that I needed to sort the front brake, because a lack of concentration on the journey to the garage revealed just how little margin for error I had using the pathetic 6" diameter of the CB175 brake. Switching back to a disc setup was deemed too expensive. But I established that the CB450 and CB72/77 were both fitted with an 8" drum, the largest before they switched to discs, which would be considerably better equipped to stop the heavy 500-4. So a hub/brake from a CB77 was luckily found on Ebay again, and laced to the existing 36-hole WM2 alloy rim with stainless spokes. After establishing that the old brake shoes had no stopping capability whatsoever, even after rubbing down, they were relined by a Ferodo distributor.
Also the speedo drive had been removed from the old hub, so I was looking forward to having a speedo. Alas, cable all connected up, no reading! A little head scratching and deployment of a drill told me that my non-standard speedo was geared to work in the other direction from a CB77. What to do? What if I swapped the wheel round completely? A study of the brake plate, linkages and torque arm showed that with a bit of modification this ought to be possible, and low and behold it was, with the only cost being to get the tire put back on the other way around. The speedo even seemed to be reading roughly right. Problem was I had no front brake at all... of course I had turned it into a twin trailing shoe instead of twin leading shoe brake, so had to go back to the standard setup. Like the rev counter the speedo will have to wait.
The other problem was the Hagon rear shocks, which were way too hard and literally chucked me out of the seat over any sort of real bump. They were sent back to Hagons who reported that the spring rate was 20kg/cm instead of a recommended 18, and I asked them to fit 16's given that I never take a passenger and prefer appreciably softer suspension than what was on it. The damping rate was medium, which should be fine.
Stage 8: Registration
To register a bike like this with no log book you have to get a dating letter that confirms its age. I sent a letter to Honda UK along with a cheque for £30 but 6 weeks later it came back saying that the little man in Italy had been unable to find my chassis number on his card index system... hmmmm. At least they had the decency to send the cheque back. But as luck would have it Mark who did the MOT gave me the details for West Coast Imports, who were most helpful and gave me the necessary within the week. Then I found out that I also needed customs clearance that all import duties and import VAT had been paid, and if I couldn't prove they had I'd have to stump up several hundred quid! But luckily a bit of well-placed charm worked wonders and the lady at customs and excise faxed through a clearance letter without me having to pay a bean, despite neither them or Honda UK having import records going back that far.
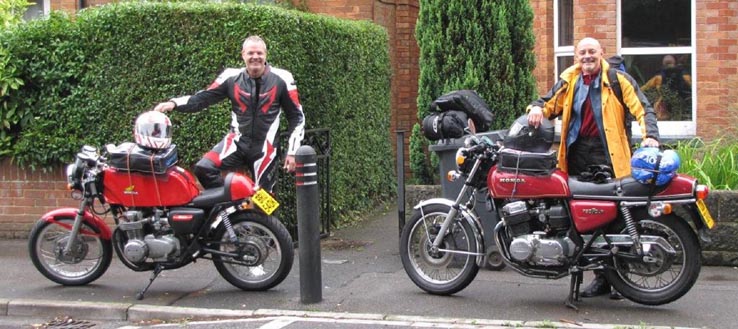
So now it's off to the Isle of Man at the end of August to see my mate Chris race in the MGP. What do you mean I must be mad to take a thing with this riding position all the way from the south coast to Liverpool and back... pah! I'll be kept company by another mate, Ken, who I've also persuaded to come out of biking retirement and who managed to find a lovely original '77 CB750 on Ebay for a lot less than I've spent.
...and now for the bill, oh dear, oh dear, oh dear:

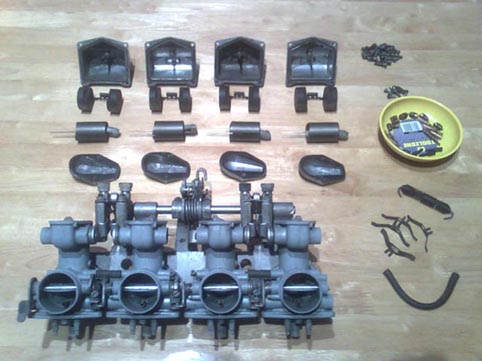
Footnote on carb stripping and cleaning
I did intend to use the new 500 carbs on the bike originally, so they were stripped and cleaned by boiling in concentrated lemon squash mixed with a little pure lemon juice to beef it up. If you don't want to separate the four carbs then a metal bread bin with about 7 litres of liquid did the trick, with "cooking time" of anywhere between 30 and 60 mins (excluding the long time mine took to come to the boil), depending on degree of dirt etc. Make sure you rinse thoroughly in clean water afterwards. The main bodies go a very dull grey but look ok. The jets can be cleaned separately in a saucepan - the pilots in particular are very small but you should be able to see a small hole down the middle when you hold them to the light - if you can't, they're blocked. However, despite all this work, when I fitted them to the bike it wouldn't even start, just kept making loud backfires. It seems that this may be a risky process, at least if you don't have a compressed air line to blow through all the holes straight afterwards.
Unfortunately I was forced to sell this bike in March 2011 due to lack of funds - and, of course, I only made back significantly less than what I'd spent on it. However by November of that year I had replaced it with an equally challenging CB750 project...