CB750/900 CAFE RACER
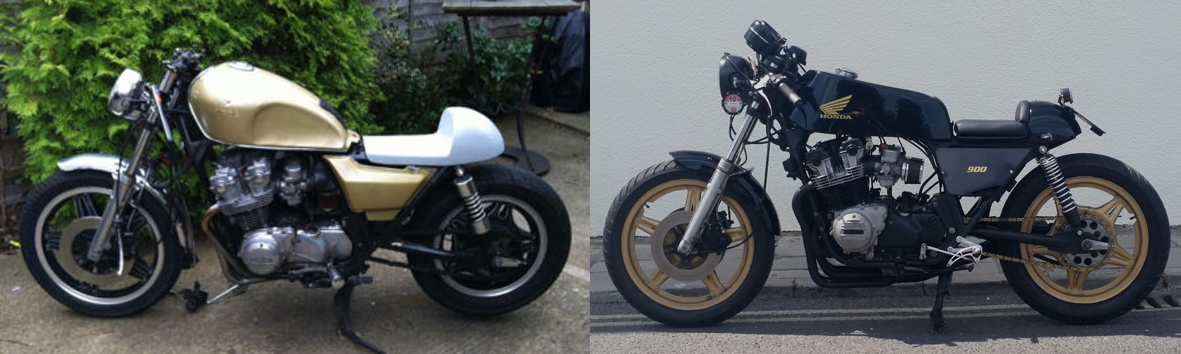
Purchase: This was originally a 1980 CB750C or Custom, ie the cheapo Harley effort. It was imported from the US in 1998. When I bought it off EBay for £580 in Nov 2011 it had 33k miles on the clock. It had had an MOT earlier in the year, then the owner had tried to start cafe racing it but found the job too much. Apparently it had been running ok, although I have my doubts having found various problems since. The rebuild was delayed by the fabrication of a whole new tank, so was completed in July 2012.
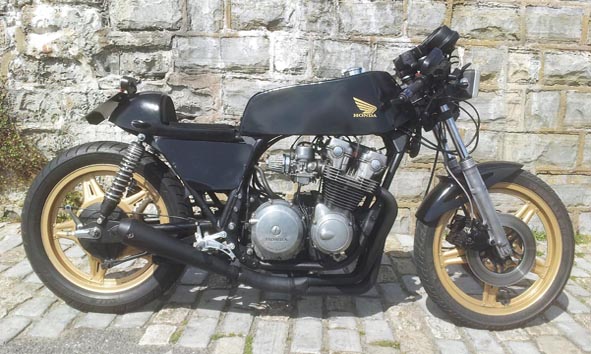
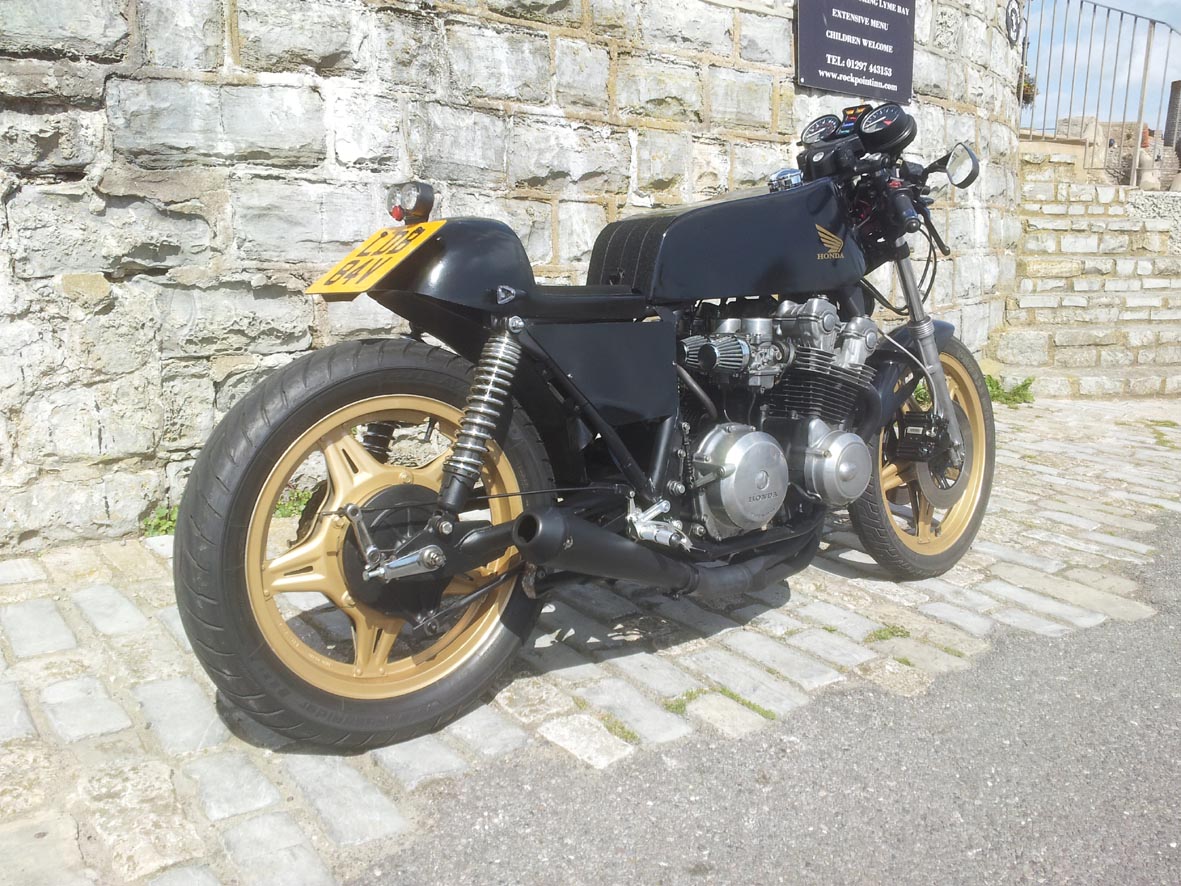
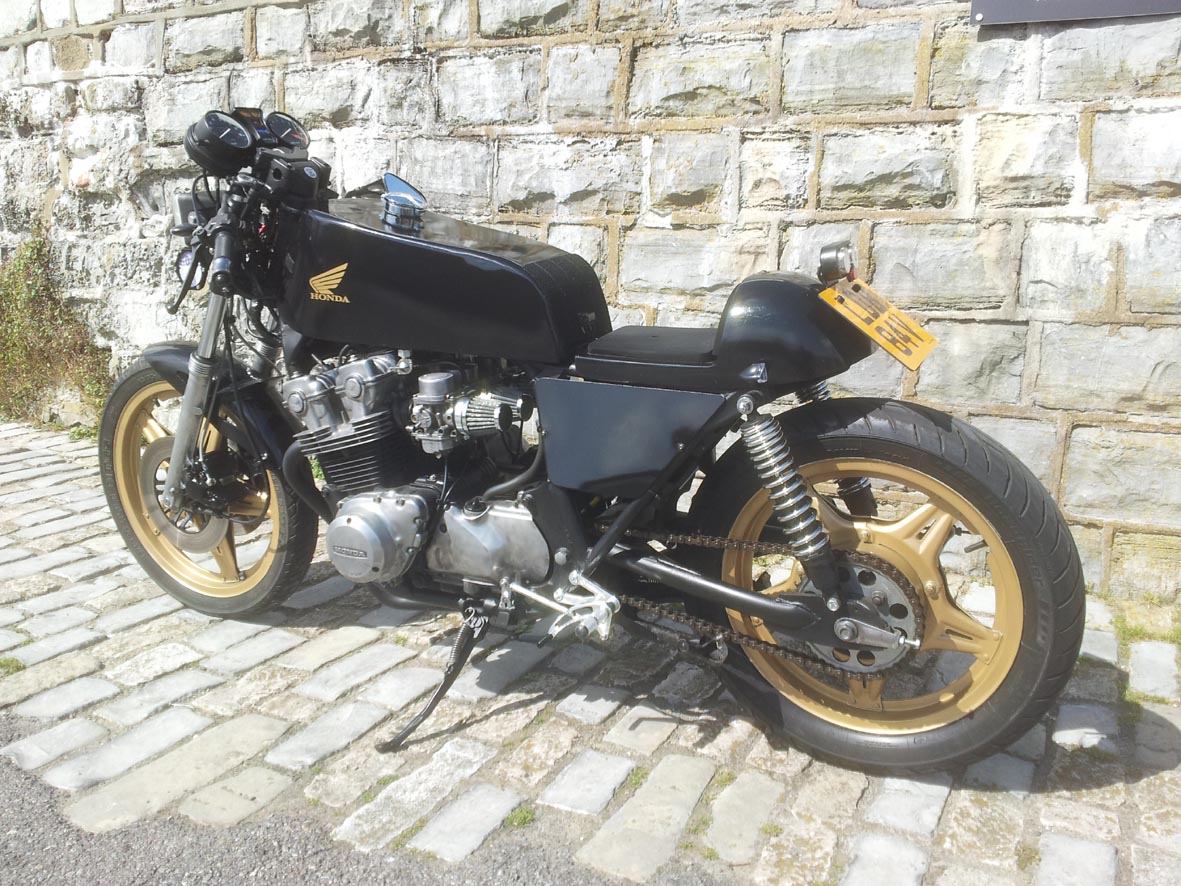
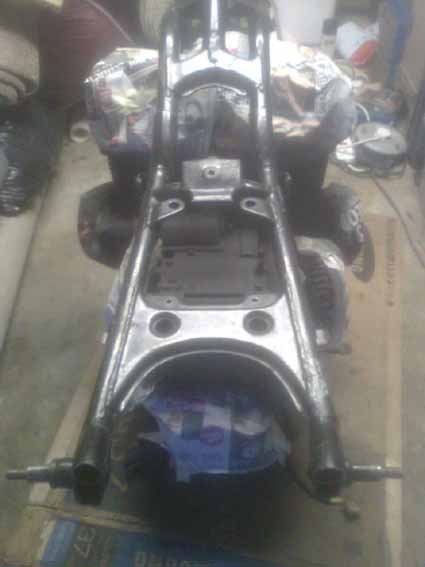
Cleaning and Spraying: I completely stripped it down except for the steering head, and the engine was not removed. It was a lot scruffier than it looks in the picture - I don't think the inside of the gearbox sprocket cover, or all around the centre stand lug, had ever been cleaned! I masked first the engine to spray the frame satin black, then the frame to spray the engine matt black except for the head and covers - it had flaking gloss black paint on the crankcases and barrels.
Wheels and Tyres: I realised the rear wheel on the C was only 16" instead of 18", and they don't make a reverse Comstar in that size, so I had to source 18" rear and 19" front normal Comstars from Ebay. The rear came from a 81 KZ that still had the drum brake, the front from a CB250N, although the disc and calliper still fitted when I swapped them over and it took the spacers, spindle and speedo drive from the original bike, so no complications there. The wheels and forks were sprayed gold. The bike also looked as if it had a much longer swinging arm than normal with a big gap at the front, but when I sourced the swing arm from the same KZ bike I found the lengths the same so returned it. The front tyre was ok, on the rear I fitted an Avon AM26 R 110/90/18. When I fitted a 16-tooth gearbox sprocket to go with the standard 40-tooth rear sprocket from the C, it gave gearing very close to the 15:38 of the standard 750.
Electrics and Instruments: The loom was pretty good and hadn't been too messed about, it just needed a good clean and retaping. A square CEV headlight and small LED rear light cluster were fitted and, because the standard wiring had the lights on all the time (standard on US bikes from 1980), a rocker switch was inserted into the loom. Small arrowhead indicators were also fitted, along with a new relay matching the wattage. A proper starter solenoid with inboard fuse was sourced, and the speedo had a broken face so was replaced with a good s/h unit, as was the warning lights cover.
Exhaust and Carburettors: The somewhat ungainly Marshall silencer was cut off and a new universal classic megaphone fitted via a diameter-reducing connector available from Ebay. The carbs were thoroughly cleaned and the primary and secondary main jets increased from 68 to 78 and 102 to 120 respectively, to accommodate the sports exhaust and individual 54mm mesh airpods. Two pilot jets were also replaced, and the vacuum pipe for the fuel cut-off (another US safety feature) blanked off.
Bodywork and Frame: The bike came with clip-ons that needed properly fitting with the standard switch-gear. A brand-new set of universal rear-sets from Ebay were extremely good value, the mountings bolted to the frame. The fibreglass race seat that came with the bike was fitted onto steel cross-supports similarly bolted to the frame, along with a GRP CB900F front mudguard with integral spoiler. A longer side stand from a 78 750F was fitted to cope with the larger rear wheel.
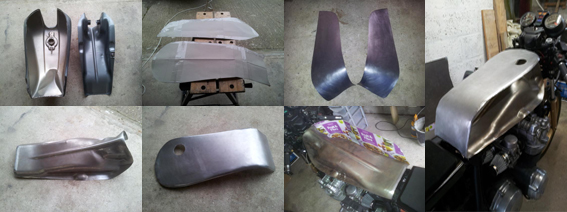
Petrol Tank: I really wanted a CR750 replica, but these are only made for the SOHC frame that has straight top frameailike the bent rails on the DOHC frame. So I decided to buy a damaged but nearly new tank from a CB900F, and removed the base. I then made up a cardboard pattern for the top, and fabricated it from 1.6mm steel sheet, using a 10mm wide steel former to hammer the radius at the edges. A hole was also drilled for the chrome Monza fuel filler sourced very reasonably from Ebay. The top was taped to the base, and a cardboard pattern made up for the RH side panel, both of which were then fabricated from steel. I then had the whole ensemble welded up, dressed and sprayed by John Fairclough Engineering Services on the Pulham Business Park (01300 345871) between Dorchester and Sherborne. John did a terrific job on the budget I gave him and, as you can see from the pictures of the finished bike, it looks pretty good, along with the matching flat side panels fabricated from similar material.
First Road Test
When I first turned the fuel on after the tank was fitted... fuel poured out of all four float bowl overflows. I removed the carbs and did what I should have done anyway - removed all four floats, checked them for leaks by immersing them in fuel (there were none), then removed the float valves and reground their seats by placing a small amount of toothpaste (with baking soda) on each tip and rotating them gently in their housings with pliers. This worked, and then the bike fired up fine and sounded pretty good... but soon went onto two cylinders. After a while I thought it might have needed to be on reserve because it only had a gallon of fuel in, so I went back to the garage and started it again, at which point it was fine. So I headed out for the first road test full of excitement only to get... ten yards up the road, at which point it went onto two again. Plus I could see the front fork seals streaming oil and the neutral light was coming when the clutch was depressed. Almost as depressed as me...
Sooo, I put it back in the garage, left it overnight then got to work the next day. The neutral light problem was traced to a small diode fitted into a junction box on the main loom behind the LH side panel. Apparently if this fails it causes exactly my symptoms, and although I couldn't easily find a replacement for my bike there was one for a CB100 (called a rectifier this time) that looked remarkably similar. Anyway it solved the problem.
New fork seals were also ordered and fitted. Note that if you want to keep the fork sliders in the yokes, as I did because I didn't want to remove the clip-ons and headlight brackets etc, then to remove the Allen bolts at the base of each stanchion, which can only be done after the front spindle is removed, it helps to bridge a piece of wood of the right thickness between the mudguard mountings on the forks to keep them stationary relative to each other. Also to get the old seals out it helps to heat the top of each stanchion in boiling water, then prize up from underneath with a large flat screwdriver, rotating as you go.
This brought me onto the intermittent firing on two. The problem was easily traced to Nos 1 & 4 cylinders. But swapping the coil leads over revealed the coils were both fine, as did swapping over the junction boxes for the CDI units. Having also checked for continuity in all the wires to these points, this only left the loom to the pulser coils that lie inside the LHS timing cover. Although it all looked fine, the multimeter showed that the unit for Nos 1 & 4 was not showing any resistance and obviously faulty. The whole loom comes as one so you have to renew both pulsers, and new from CSMNL this was 160 Euros! So I managed to find a s/h replacement not from Ebay but from Roukama Motorsloop Holland, which cost 40 Euros and arrived in 2 days, impressing me massively. This cured the problem. So it's worth noting that although to me it's counterintuitive, these pulser coils can fail intermittently rather than as an immediate one-off. The timing was checked with a strobe and found to be fine.
By this time I also thought I'd better retension the cam chain (just slacken and retighten the two 10mm bolts at the centre rear of the cylinder barrels and the 14mm bolt with locknut at the centre front, while keeping the engine on compression so the chain is under tension). I also checked the valve clearances only to find that at least half were down to 0.001" or even less! They do tighten as the valves bed into their seats, and obviously no one had bothered to reshim them for a while. I ordered the c-spanner-type tool required to lift the valves so the shims can be removed, and waited for it to arrive.
In the meantime I thought I could at least chance the...
Second Road Test
This time all was well until... I went to stop at the first corner I came to, and the brakes were about as good as a wet sponge. This was shades of the old problem I'd had with my 500, but that was a drum setup, whereas now I had a disc (although admittedly only one). I already knew the lever was full and I'd rubbed down the pads to make sure they weren't too glazed but, even after I'd given them time to bed in again, the brake was as useless at the end of my test run as at the beginning. New pads seemed to be the only option, so they were ordered and the bike laid up until they arrived - it was too dangerous to ride it regularly as it was.
Other than that the test was a great success. The riding position was roomier than the 500, with the rear-sets about an inch lower, although it still felt nice and narrow. The handling seemed to be ok although I was hardly pushing it. The clutch and gearbox seemed fine and, although the tickover was erratic because the carbs had yet to be balanced (no point until the valve clearances have been sorted), and although when I opened him up properly to begin with he had a big, big misfire, this seemed to clear towards the end of the ride and he pulled pretty well considering he's still not set up right. I certainly had 85 on the speedo - and what a pleasure to have one of those that worked! - far sooner that I expected, and had to knock it off and change down well before the next corner through lack of stopping power. Other than that the front brake light was sticking on and the chain fouling the centre stand, but these things are easily sorted. All in all, nice work and a great bike ;-)
The main work now was when the valve tool arrived and, let me tell you, shimming a DOHC 750 when all the tolerances are way too tight and you don't know the size of the shims already in the bike is not a two-second job (see separate notes below). Once the clearances were all close to 0.10mm (it's better for longevity to set them relatively loose, because the shims and cam surfaces don't wear and the valves simply bed down further into their seats, so clearances on these tend to reduce rather than increase over time) I also balanced the carbs (no point doing this beforehand).
I also fitted the new pads and sorted the brake light and other bits and pieces and it was time for...
Third Road Test
Disaster... The new pads were a tight fit, but when I got about half a mile up the road I realised they were stuck solid! I had to let them cool down and creep back slowly. I took the new pads out and tried to prize the piston back further into the caliper but it would not budge. Not fancying a strip-down when I knew I'd probably be fitting twin discs, I put the old pads back in and went back out. This time the brakes didn't feel quite so shocking so I really opened him up once warm and it was great fun, he revved out well and was great fun through some fast sweepers near our home.
The next day he sailed through the MOT (helped a little because the terrific proprietor of the old-style garage-cum-petrol station was old enough to remember my old man). So I took him back to the garage ready for a twin-disc conversion asap, so that for once I'd have confidence in the brakes.
I easily sourced a cheap set of twin-disc forks with pitted stanchions and an extra disc, both from a 750KZ. Although the forks looked identical, I was surprised to find that the caliper mountings were about 10mm different in height between the two (finding out later it was to accommodate slightly larger discs on the custom) so I had to swap both fork sliders having again fitted new seals, but leaving the other internals alone. I was then lucky enough to find a pair of reasonably priced KZ calipers from Roukama again that would match the forks, although they needed to be completely stripped, cleaned and rebuilt. Reasonably priced KZ discs were also acquired from two separate Ebay sources. However it seems no one makes up bespoke brake lines any more so I was forced to buy an expensive Goodridge braided kit. The total cost of the conversion was around £200 excluding the money I made back from selling the original parts removed.
At the same time I took the opportunity to refit the original 18-tooth gearbox sprocket to raise the gearing, because I wanted to be able to cruise at 50-60 in top without the bike labouring so much. I also swapped the gearchange linkage around because I'd been having trouble getting used to the standard 1-down 4-up configuration, which is the opposite of what I had on the 500 and on all my old race bikes.
Fourth and Fifth Road Tests
Getting there. The brakes are heaps better although I've had real trouble bleeding them after the whole system was stripped down, and they are still way too spongy - the problem seems to be air at the top of the system, not the bottom. But I seemed to have a terrible "hanging idle" where the bike would continue revving at around 2500 rpm every time I shut the throttle, sometimes for about a minute before returning to a normal idle. I checked the timing advanced mechanism, then found that on the main DOHC chat forum they say you cannot get these CV (vacuum) carbs to run properly without an airbox. So I mocked up a simple one out of cardboard and, guess what, the problem was still there. So off came the carbs, the slow running jets were cleaned with guitar wire, the throttle butterflies were synched by hand, the pilot jets were checked again, and all the cables rechecked and greased etc.
When I tested the bike again the hanging idle had disappeared, but this time the bike would hardly run at low revs at all. It felt way too lean until the throttle was opened up... so off came the carbs again! This time I was running through an even more thorough set of checks on the slow running and pilot jet channels when I discovered that the two outer slides were stuck solid! A check on the internet revealed that it's common for the caps the slides rise up into to get distorted if they are dropped when cleaning etc, but I'd never even had them off. Nevertheless I spent about 10 hours across three whole days, first with car polish as recommended, then with wire wool, then with 360 grade wet and dry, all trying to get the bloody things back to round so the slides did not hang. After about 3 hours work one of them was fine as long as it was rotated 180 degrees from normal (based on the writing on the top), but the other, even after desperation rough honing with a course grinding wheel in a hand drill, simply refused to free off fully - especially right at the base where it should be hardest to have a distortion, especially if the caps haven't even been removed. Yet even this produced no result, so after seven hours on this one cap alone I gave it a full test by throwing it in anger and frustration across the garage and against the wall. This did indeed not only make the distortion worse, confirming what I'd read, but it also cracked the cap half way around the rim. I felt it served it bloody well right.
Rest assured I hadn't taken this drastic step without first checking I could get a s/h replacement cap from the US pretty cheap. And when it arrived in less than a week, delight of delights, the bike ran beautifully, with the only further adjustment being to richen up the pilots another 1/2 turn to 2 turns out. It's clear the bike couldn't have run even vaguely right in its first few tests with two stuck slides, but how on earth I managed to distort the two outer caps so badly without even removing them I simply do not know. I would also emphasise that those experts who insist you can't get a DOHC 750 to carburate properly without the standard airbox must be setting some very exacting standards, because after all the problems the bike does not carburate or tickover perfectly, but it's pretty good and more than adequate for me.
So there you go, it's now time to just enjoy ;-)
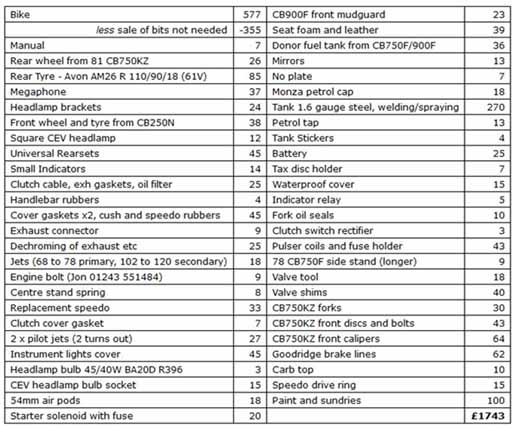
...and now for the bill, not as bad as with the 500 although the one-off petrol tank and double front disc conversion really ramped it up. Still, I must be learning...
Footnote on setting valve clearances on a DOHC CB750 Honda
You can follow the advice in the manual in terms of measuring the existing clearances, but if you have to change any shims there are extra things to look out for, as follows:
First do make sure you get hold of the special Honda twin cam valve tool that keep the valve buckets depressed so the shims can be replaced. It seems these are only mainly advertised in the US now, but given the amount of fiddling with even the correct tool I'm pretty sure this is sound advice.
Second, if you don't know what the existing shim thicknesses are and you intend to keep the bike, you really want to remove all shims and measure them as a one-off exercise, especially if quite a few clearances are out. By the way you will need an accurate set of calipers to do this, preferably with digital readout, again these are cheap now on Ebay.
Third, you need to make sure the cutout in the bucket into which you place a small screwdriver to lever the shim out is visible before you insert the special tool, even though sometimes it will have rotated out of sight by the time you've rotated the cam with the tool in place, so you have to start all over again.
Fourth, note that some shims (eg for exhaust valve 3A counting from the left) will come out easier from right underneath the cam on the oil bath side, rather than spending 45 minutes trying to fiddle them out from the 'front' where the cutout but also the tool is. A magnet is also handy to get them out sometimes.
Fifth, and most important if you are removing shims and not immediately replacing them, make sure you put a 10p piece in the place of each one after you remove it. This is a perfect fit diameter-wise and, although slimmer, it will stop the cam lobe hanging up on the edge of the bucket when you turn the engine on to the next one.
Sixth, the special tool is attempting to depress the bucket but not the shim, but it doesn't always position itself correctly. So if the bucket turns when you're trying to take the shim out the tool hasn't depressed it and you have to start again. While if the shim won't seem to release it may be hung up on the tool too, although with this a little wriggling of tool may resolve the situation (as the actress said...)
Seventh, note all sixteen clearances and shim widths carefully on a piece of paper in two rows of eight, then transfer to a spreadsheet. Work out what new shims are required (they come in increments of .05mm or approx 0.002") for each to give ideally somewhere between 0.09 and 0.12mm clearance, which is deliberately at the higher end of the scale for longevity. Then work out a) which ones do not need to be reshimmed, b) for which ones you can use shims you already have that are no longer giving the right clearance, and finally c) which new shims you need to buy. It seems in this country there are no longer garages who have boxes of these shims for you to turn up and swap, even though the 25mm size was fairly ubiquitous on Jap bikes of this age. What is more, take my advice... do not try to grind shims down when clearances are too tight!! I tried sandpaper, then a file, finally the edge of a grinding wheel, and didn't change the thickness by a single thou after half an hour! So get your wallet out and pay between £3 and £8 per shim depending on the size - and incidentally in the UK David Silver are much cheaper for these than Wemoto or CSMNL or US EBay suppliers. The only alternative is you might get them reground by a machine shop with a surface grinder, but even then there seems to be some debate about whether they need to or can be properly rehardened afterwards.
And there you have it, simples ;-) This is my experience anyway, I'm sure I've got some bits wrong but at least some of this should really help people not waste time like I did, even after I'd trawled through God knows how many internet chat forums looking for relevant advice...