
1973-4 AERMACCHI HD SS350 GOLDWING STARTER CONVERSION
I phoned Ron Lancaster of Aermacchi Sprint in the US who over the years has supplied a great many of his Honda Goldwing starter conversions. Because he's also well-known for prepping race bikes he had heard of my father Syd, and worked with guys like Dave Roper, who I had some good battles with while I was racing. So we had a good old chin wag. I had already sourced a 1976-9 Goldwing GL1000/1100 starter, so he said he'd reserve one of his starter brackets for me when he next made a batch. I then got an email about a month later quoting a fairly hefty price for what I assumed to be just one stepped bracket, which was the only thing mentioned on his website, and being on a tight budget I decided to make my own. This turned out to be more complex than I'd thought, so I can now see why so many people have used his conversions! Nevertheless quite a few people on specialist Facebook forums such as 'Aermacchi Harley Davidson Sprint' and 'Harley Davidson Sprint' have also done their own, so let me talk you through the procedure.
First I had to remove the old starter, and I hit a number of problems. After the outer cover is removed, the alternator is revealed. It consists of an aluminium rotor riveted to a steel centre, underneath which lie two copper stator coils on a backplate. After undoing the LH thread retaining nut, the rotor needs to be pulled off with a puller, but using a 2 or 3 jaw version pulling on the outer circumference can actually tighten the rotor onto the taper, and even result in cracking. So instead one must pull on bolts inserted into the two threaded M8 x 1.25 holes in the rotor itself, housing them in a slotted puller. It is also really important to position the holes at around 1 and 7 o'clock, to avoid damaging the two hidden coils.
The trouble was mine had been pulled off before and someone had used helicoils, which now began to pull out. Luckily there was room to drill and tap the holes out to M10 x 1.5 and, although I've read horror stories about how hard it is to get rotors off their taper, mine released without too much drama, just a healthy 'ping!' Apparently more recalcitrant ones need a hefty tap on the centre bolt of the puller, and even tightening and leaving overnight. More radical alternatives apparently involve tightening the two bolts themselves onto the stator backplate and progressively tightening each one. One chap even resorted to drilling out all the rivets to remove the aluminium outer rotor, then the coils, then using heat to free the steel centre.
In any case, the rotor was now off, and the coils were unscrewed from the backplate so as not to disturb the careful wire routing along the frame that I'd already done. The inner LH cover has two recessed screws behind the rotor that need to be removed as well as the ones on the outer edge, but even then it needed some hefty persuasion with large screwdriver and mallet to work it off. This finally revealed that the starter chain that came with the bike had indeed been removed and wasn't a spare.
Next the sprocket had to be removed from the end of the stock starter, starting with the circlip, then using a small 2 or 3 jaw puller. I used the latter with ground-down lugs, and initially the sprocket was coming off fine, until it got to the splines outside the circlip groove. Then it stuck hard. Closer inspection revealed a predecessor had somehow really mangled these, so I tried to clean them up then go again with the puller. I was using so much force that, when one jaw slipped off, I toppled forward into the bike, in the process badly bending the new fairing side bracket I'd just fabricated. I decided this was crazy and used a small angle grinder on the outer splines, after which the sprocket pulled easily. This then allowed the starter to slide through the hole in the crankcase. At last, it was off!
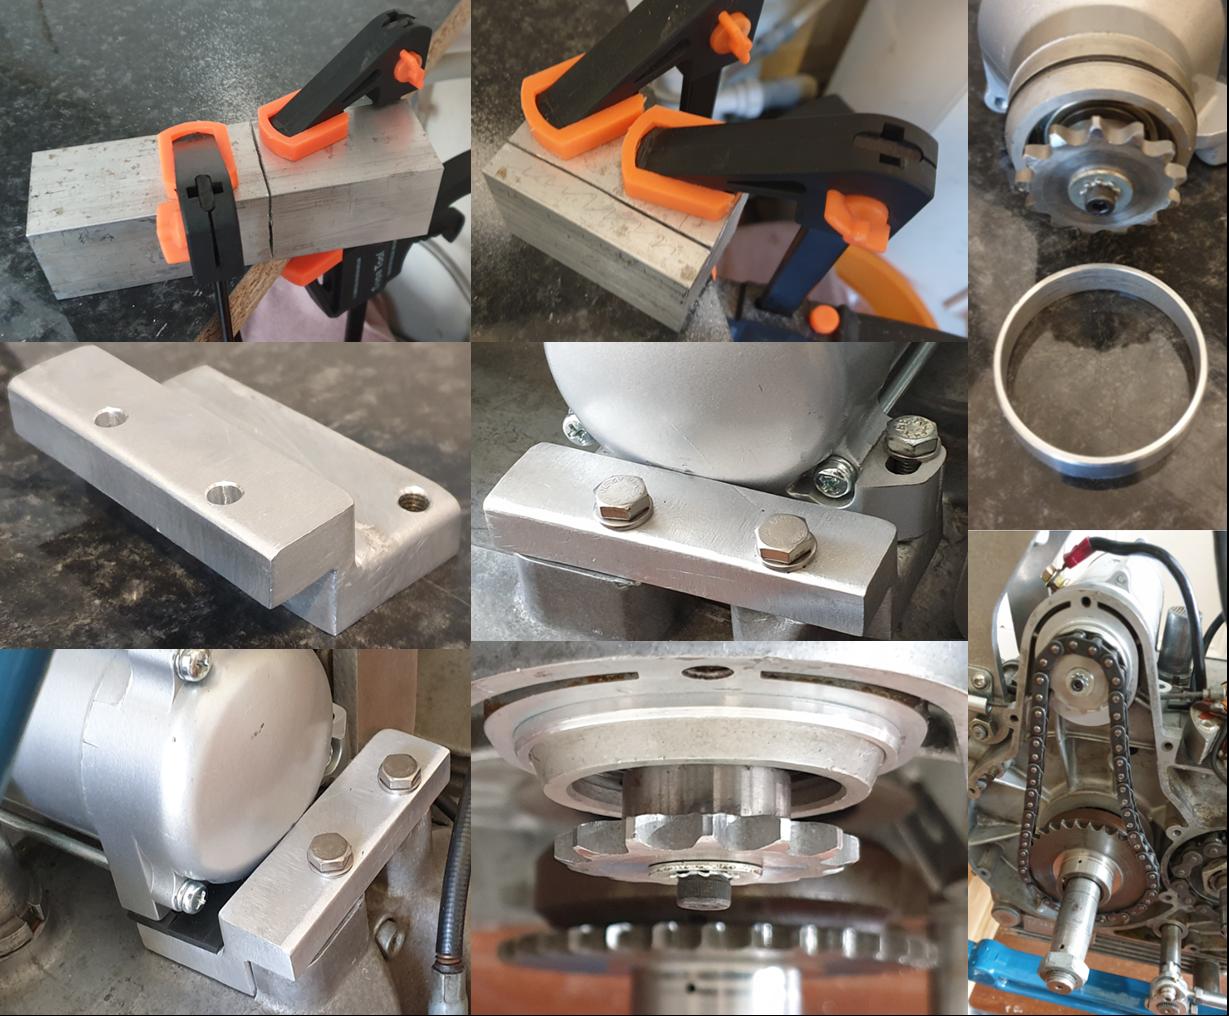
As for the new starter, I would need to fabricate the stepped bracket for the rear. I had plenty of pictures to go on, from Ron Lancaster's website and elsewhere, and sourced a piece of 2" x 2" x 3" aluminium billet for the job. In fact if I had realised how long it would take to work through the various thick cuts using only my trusty hacksaw I think I would have gladly given Ron the money but, about 3 days and several meandering cuts later, I had something that looked nothing like the beautifully machined items in the pictures I'd seen - but it fitted and it did the job. Incidentally, the important thing is to support the right rear of the starter where a sole mounting bolt screws through a lug into a threaded hole in the new bracket. The left-hand side of the starter also has front and rear pedestals but these don't need to be supported, although if one really wanted to go 'belt and braces' they could be.
What Ron's website doesn't mention is that he also supplies an 11mm wide spacer ring with ID 46mm and OD 50mm, because the journal on the Goldwing starter is smaller than the original where it passes through the hole in the crankcase. Moreover he drills and taps the end of the new starter to retain the sprocket with a small bolt. So I engaged an excellent local engineer, Tom Mason, to do the necessary, then locktited the new ring into the crankcase aperture, although leaving it around 3mm proud of the edge at the front so that the two sprockets would line up.
Once the starter was in place I realised my drive chain was missing a split link, but soon ordered one at the standard size of 3/8 or 06B. When fitted however it looked somewhat loose, and one Facebook correspondent told me he had refitted the sprocket from the original starter, which is slightly larger. So I did the same, although it didn't fit on the new starter splines anywhere near as well and the chain still seemed a little loose. (Note that the pictures show the Goldwing sprocket.)
Nevertheless it turned over fine so the job was completed with a little oil smeared on the chain, while gasket compound was used to refit the inner cover (there is some oil in this compartment that enters from a hole in the base of the crankcase, but the gaskets are expensive and impossible to find in the UK). The coils were then screwed back on, and fine grinding paste applied to the taper on the shaft. The alternator rotor is keyed on via a 3mm diameter, 6mm long dowel, and mine had sheared, so Tom turned me up a replacement for that too that was now inserted before bolting the rotor back on.
Fingers crossed I will now have many miles of trouble free starting.
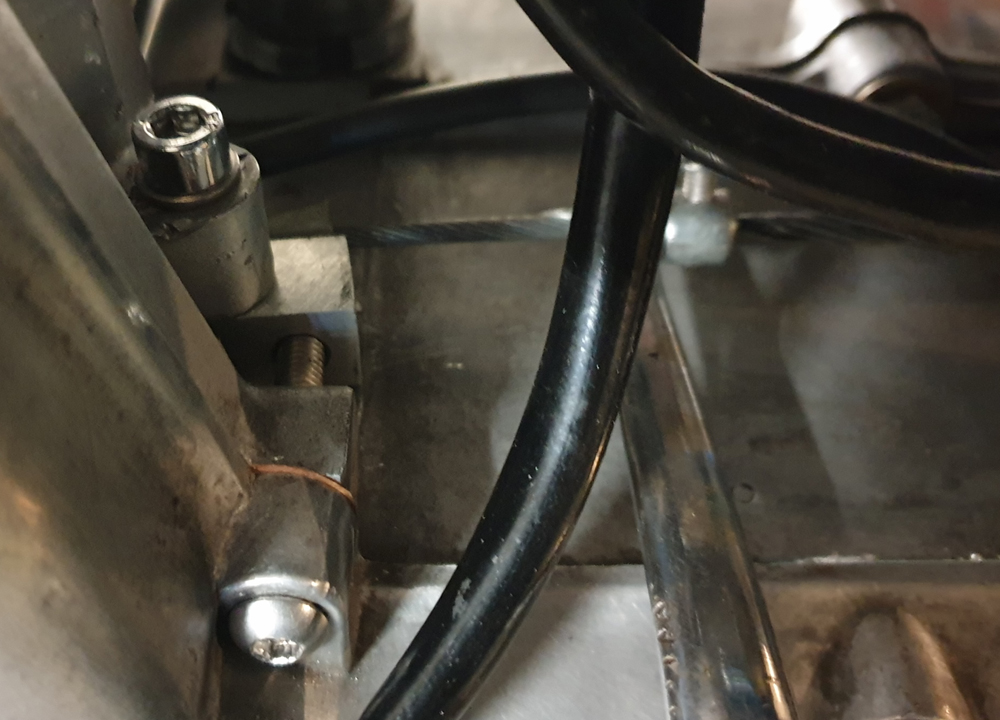
POSTSCRIPT I subsequently found that in regular use the motor was twisting in its housing in an anticlockwise direction, because of the torque generated and the rear bracket alone not being sufficient. Initially I tried to use an aluminium support block underneath the front left-hand lug on the starter and bolted down through it, fixed to the crankcase with araldite. However despite several attempts the araldite didn't hold. Then it came to me that I could utilise the adjacent inner left-hand cover bolt, moving the support block rearward and drilling a plain 6mm hole through it. A longer bolt then still does up tight in the cover, but at the rear locates in the plain hole (no thread) and stops the starter from twisting. So far this has proved very successful.
Return to main Aermacchi Cafe Racer page here.